The progress blog has been a bit quiet lately because there’s a lot of things in flight without a lot of cool things to show. Here’s a mini update on some things still in flight;
Surface crawling Swarm Alien
I’ve been experimenting with the idea of swarm aliens not being humanoid by default, and instead they are pesky little spider like creatures. The movement code for this has been really difficult, but here’s where it’s at right now.
There was a suggestion that I make the camera work kind of like the Skulk from Natural Selection 2, which I agree with. Right now the camera is just locked to the orientation of the spider for testing.
This is on semi-hold for now. It’s a cool thing to explore, but there are other more pressing things to work on.
Prediction System Testing
The prediction system introduced a handful of bugs. These were found in a short playtest last Monday. None of them super terrible, except for the one where dedicated servers don’t work, cause why not?
The test went pretty well overall, the real test will be with a full 12-16 player server.
Brood Alien Visual Upgrades
I commissioned the guy who made the monsters in Shoothouse to work on the Brood Alien for Morbus. It’s been a long back and forth process but it’s finally starting to be tested in game. I don’t have the textures yet, and have just been testing how it looks in game and animations.
I asked him to use the Citizen Human rig for the Brood Alien. S&Box doesn’t have native animation retargeting tooling built in (which sucks) so I had to manually retarget all the Citizen animations to work on the Brood Alien. This was a massive pain in the ass.
But hey, we got movement!
The tail was looking really bad so I went ahead and built some logic to procedually animate it based on movement;
It’s been hard
The past 3 weeks have been a ton of unexciting grinding. The prediction system took an entire week to implement, and then nearly an entire 2nd week to actually integrate back into the main Morbus codebase. Transformation was incredibly hard to do get right too.
My motivation has been lower this week. I might take a bit of time off soon or take a bit of a break to recharge.
In the last dev blog where we talked about the last two playtests networking came up a lot. Either it was network lag, strange movement, and a general concern about client authoratative movement.
Last week I decided to bite the bullet and try to nip this in the bud.
This was a huge undertaking and my brain is still a bit fried from all of this. I worked super long days for essentially the whole week but it paid off.
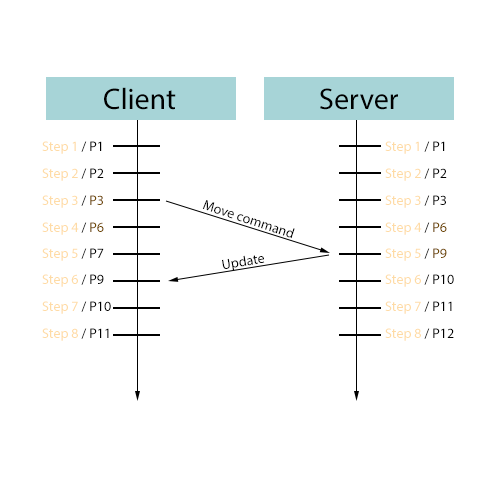
Server Authoritative + Client Predicted
In basic terms we need to make it so when a player wants to move, they send the input command to the server, which then processes the command causes the players character to move.
On the (player’s) client side, this command is “predicted” by running the same movement logic and having the player character move before the result from server has arrived.
This diagram illustrates the time it takes for the move command to reach the server and then get back to the client. In our code we don’t wait for the server response to update, instead we take our best guess at what it would be (by running the same movement code.)
If for some reason the server response/update differs from the client predicted state, reconciliation happens, which in simple terms means we drop our predicted state and replace it with the server state.
Moving Platforms
Things start to get really complicated when you want to support a player being on a moving platform. Something like an elevator or a tram.
I got the core server/client architecture done in like a 1.5 days, but getting this part to work right was much more complicated. I’m still not 100% happy with it but I think it’s the best we can do right now.
Lag Compenstation
The magic really happens when we do things like shoot other players. Engines like Source or Unreal handle this by “rolling back” the world state to the moment when the client shot the bullet, and seeing if the bullet would collide.
This essentially means that as long as the client saw the bullet hit, the bullet would hit on the server. Since it takes time for the client input to get to the server, rolling back becomes necessary because the world state is no longer the same on the server.
Okay so let’s look at this demo.
The lines represent the bullet path as it flies.
The purple shapes represent the rolled back hitboxes of the player.
What’s happening is I (the client) am shooting be clicking my mouse. I immediately see where the bullet impacted on my screen (white sphere debug draw) and then a moment later i see some purple shapes show up, as well as a yellow line.
The yellow line represents the servers interpretation of where I shot from, and the bullet trajectory. The purple shapes are the hitboxes that the server believes that I saw. We see green circles when I hit a player and both the server and client (me) agree.
This is being recorded with 200ms of lag, which in my mind is the very max someone should ever play with (though honestly 100ms seems more reasonable.)
This is hard to talk about
This is a lot of deep stuff that’s kinda hard to talk about. My brain is a bit fried from all of this still so i’m trying to do my best. I haven’t posted a blog post in awhile so I wanted to post something even if it’s a bit half baked. I might do a follow up post in the future about this.
What’s next
This was all built in a separate test project, just to prove out the concepts. Next steps are to make sure i’m not code smelling much, and then it’s going to be to introduce this into the Morbus codebase and migrate the players to use it.
I’m sure this will be a tedious and bug heavy process so i’m not predicting another Morbus playtest for at least another week.
We had two more playtests this past week. Playtest 2 was on a Monday with at most maybe 9 players and then Playtest 3 saw up to 16 players I believe. Let’s talk about the results
The Good
Lots of bugs were found in Playtest 2, I fixed all of them for Playtest 3 and besides an initial hiccup (where voice chat and round ambiance was broken) there were only 2 bugs found. This is great since it means less bugs!
Well sort of, there were more bugs, but they might be related to networking stuff which we’ll get to later.
Some good direction on new features/QOL changes was also figured out. End of round breakdown is still missing and it should be in the game soon. There’s little tweaks like clearing the “last seen time” when we switch from Warm up -> Main game state.
The Bad
Something isn’t right with the networking.
For these playtests I ran a dedicated server on my computer, and while I think the lag was better than when I ran a listen server for Playtest 1, I think a lot of players had a laggy time and later on in the playtest some functionality just straight up broke.
Network Lag?
Brood Aliens move pretty fast, and right now clients are simulating their own pawns. This seems to be the “standard” S&Box way to do things. You are the owner of your own pawn, so all other players/connections get the position of your pawn from you.
However I’ve noticed that if a player lags, their pawn starts teleporting around the place. It doesn’t always smoothly interpolate to where they should be. Also i’ve noticed that if the players starts to sprint and they’re moving very fast (ie they are in brood alien form) there is a higher chance that they’ll start teleporting around the place.
This is bad. Like really bad.
I’ve always noticed some weird “jank” with multiplayer movement in S&Box, but there’s gotta be some way to solve this, right? And in a game like Morbus where some players need to move fast, the other players need to see them clearly.
Here are things i’m considering to improve our situation:
Boost Networking Update Rate
By default the networking update rate is 30. This means 30 times a second we’re looking at objects and deciding whether or not to update their networked values.
So at most another player will only get a position update from us 30 times a second. If we’re a brood alien and we’re moving fast, that could be really bad for the other player.
Counter Strike 2 uses a 64hz tick rate, I was essentially having a 30Hz tick rate on networking updates. I didn’t realize this setting existed until I was writing this blog post so this will be the first thing we play around with.
Get rid of Rigid Body
I’ve been using a player controller that’s based on Facepunch’s Player Controller. It partially uses the game’s physics engine for movement.
I was encountering weird issues where players would jump into each other and it could cause them to rapidly rebound away from each other at illogical speeds. A suggestion was to make clients disable RigidBodies on all other players. I think this fixed the issue, but I’ve been thinking about things a bit more existentially.
I’ve talked to a couple other game developers in the community and a lot of them seem to avoid using RigidBodies in their player controllers. I’m thinking I should do the same. I don’t want to involve the physics system in player movement, it seems like a recipe for disaster.
Server Authoritative Movement
I’ve started to think about how I could make movement server authoritative. I want movement to be responsive on the client side, but I also don’t want to be relying on the client to tell all other clients their position.
It’s also been brought to my attention that if a client fails to acknowledge an update, a minimum of 250ms passes before another update is sent. Huge lag.
I imagine this will be very hard at best, and at worse, impossible in S&Box. Kuro a formed Facepunch developer who made the networking system in S&Box posted a “sbox-prediction” library where he prototyped something like this. It’s really bad. I don’t know if it used to work better, or maybe it just doesn’t work anymore, but I was shocked at how unresponsive it felt. He’s a strong engineer so I’m hoping it was just incomplete because i’m not sure if i’ll be able to do better than the person who made the networking for S&Box.
Slow everything down
If it turns out that fast movement in S&Box doesn’t work well, I guess we’ll just have to make the game slower?
Things just randomly broke?
At least 2 players encountered a bug where they just couldn’t open doors. They were working fine before, but now they don’t work anymore? Crazy stuff. It’s like the dedicated server starts to die after it’s been going for awhile and things just stop working right.
Maybe the scene needs to switch?
I don’t have enough data yet to really figure this out, but it’s concerning.
The woes of a new engine
Maybe this just comes with the territory of a new game engine. There’s stuff that hasn’t been battle tested yet and no best-practice patterns to rely upon. I might be one of the first people figuring this out. I am quite nervous about hitting a hard obstacle and there being no way around it. What if S&Box can’t handle fast paced competitive shooters?
I hope that Facepunch will have my back if that happens. I doubt they would want their engine to be in such a state. I just hope that if I raise an existential issue that they would address it in a timely.
Next Time
There’s something up with performance, possibly server performance. I need to remove the variable of my computer just not being powerful enough to run the game + a server at the same time.
Next time we do a playtest i’m going to host the server on a dedicated server. Hopefully any of these weird bugs other people occasionally see will happen to me.
Gameplay Footage
I recorded a little bit of footage, check it out!
In this clip we can see me venturing away from my group to go turn the generators on. I eventually make my way to the bathrooms where I encounter another human. Amazingly they don’t kill me out of paranoia/suspicion. Together we kill a handful of aliens and survive until the end of the round.
You can see a few moments of the weird movement/lag i’m referring to near the end of the clip.
Short and sweet little blog post for a gruesome topic.
We’ve been needing to gore things up a little bit, add a bit of red ambiance to the game, so I spent the day working on some blood splatter effects.
Brood Aliens shoot out little chunks of gore when they transform. The gore creates a sort of bloody trail that falls to the ground. Either when the gore hits a surface or the trail hits a surface, it leaves behind a blood splatter decal.
Some of the decals despawn fairly quickly, but some of them stick around for up to 2 minutes to help provide hints to humans about when/where a Brood Alien transformed.
Thanks to my buddy Necrossin for pointing me in the right direction for the particle effect on the blood trails. I had to create my own ParticleController in S&Box (since the type of effect I needed wasn’t built in)
The way it works is by creating a line between each particle that’s been emitted, in order from oldest to newest. This allows us to simulate a sort of “rope” if we then physically simulate the particles and emit them over distance travelled.
Other gore
The ability for aliens to eat corpses is going to be added soon, this will also involve more gore so it’s good to get this in now.
Okay this is a hot one, I think this is going to be controversial for OG Morbus players, but hear me out, just give it a listen.
The Reason
Brood Alien upgrades are fun and cool in Morbus. It allows the Brood Alien player to express their play style, adapt to the human players, and get stronger.
We want upgrades, we need upgrades.
The Problem
Rounds in Morbus are fairly short, let’s say 8-12 minutes ideally. How much time is it reasonable to spend looking at an upgrade menu?
I probably am going to figure out a “go to” loadout and just repeat that over and over again. Some players have even mentioned that they bound keyboard shortcuts to specific upgrades so they could just press the keys on their keyboard instead of opening the menu. Power users!
So does having all the choice matter if I’m going to do the same thing every game?
Also as an aside, we should consider that Brood Aliens getting an upgrade point after killing a human is giving the Alien team an extra bonus when they already received one (they now have an additional alien on their team.) That’s a recipe for a snowball.
A Possible Solution
We need to optimize for a few things;
Simplify
Big upgrade trees, multiple paths, reading 16 different upgrade options and learnings what’s what. Yuck. That takes too long.
We need something simple with a low barrier to entry.
Diversity
We should prevent players from just doing the same thing over and over again. Live a little! Try something new!
Maybe a bit of a nerf
We should make upgrades a bit weaker, but not just through the numbers. Perhaps we just make it harder to min/max.
Buckle Up
Here’s the demo, i’ll explain it below:
Randomized Options
You are given a (random) set of 3 upgrades to choose from.
The list of upgrades these 3 come from changes based on previous upgrades you’ve picked.
For example, the “Quiet Breath” upgrade requires you to have at least one other “Utility” upgrade previously chosen.
This means the pool of upgrades grows in size the more (diverse) options you pick.
Some upgrades like Lifesteal require you to have two “Offense” upgrades chosen.
Upgrade Rarity
The color “rarity” of upgrades generally reflects their uniqueness or power. If an upgrade requires you to have picked other upgrades (ie it has prerequisites) then it is considered more rare.
The invisibility upgrade requires you to have picked quiet breath first, which requires you to have picked another utility upgrade first, so it’s considered “Epic.” (it’s also just kinda epic too.) Then the even advanced invisibility upgrade which is a better version is a “Legendary” since the previous upgrade is a prerequisite.
Higher rarity upgrades are actually slightly favored to be in the set of random upgrades, so if you’re building towards a certain “legendary” upgrade you’re more likely to get it than a simple stat upgrade.
Auto Upgrading
The classic new Morbus player who doesn’t know how to upgrade their Brood Alien; say goodbye to them. With this system we can automatically choose upgrades for players based on rarity + type preference + some randomness. By default upgrades will be automatically chosen for players. They can either disable this or they can choose a specific “preset/archetype” for this automatic selection.
Right now we have a few, that are variations of favoring offense, defense, utility, some combination of those, or a balance of all three.
Why I think this might work
This actually checks those 3 boxes from earlier;
Simplify
If the upgrade process is automatic, it’s dumb simple and requires no input from the player. If they’ve set a different archetype, awesome!
However if we’re in manual mode, we’re also still very simple: all a player has to do is read 3 options and choose one.
If they’re a new player, 3 different things isn’t hard to parse. We’re talking seconds.
Limited choices = faster choosing.
Diversity
Now I can’t pick my ideal min/max Brood build every single game. I have to make the most of what I have. Builds become less about perfection and more about making what you have work.
Ideally this would lead to people trying something a bit different and actually using all the different upgrades instead of their favored few.
Granted since you can lightly sway the selection algorithm (since higher rarity upgrades are favored to be selected) this is limited, but I think it gives us a nice middle ground.
Maybe a nerf
Nerf through what I said about diversity.
Alernatives
If this is hated, doesn’t work, or just sucks I still have some other ideas.
MOBA mode
There could be an additional “Preset” mode where you build out an entire upgrade progression you want, and we save that. This is at the “lets just give up on randomness” point and we’re just back to the original upgrade tree but you can pre-make a selection path.
It cuts down the time upgrade if you already know what you want, but doesn’t really help the new player or simplify aspect. This just feels like a MOBA game to me though.
Or it’s just back to the original upgrade system, but we can have presets, and then automatic upgrading just uses a preset.
Needs are confusing for new players so I’ve tried adding some more prompts and notifications to nudge them into what they need (hah) to do.
I want to avoid just outright saying “Follow the arrow to go do X” but that might be where we need to go eventually.
What’s new
New Need Prompt
Whenever you get a need now it will display a prompt on your screen, play an alert sound, and then sort of fade it into your need bar on your Hud.
Need Critical Prompt
When your need becomes critical, we display another prompt, and say your health is being reduced.
Critical Need Status Effect
A status effect is shown when your need is critical. If you open your inventory menu and hover over it, it will tell you to go do your need!
Need Icon Tracer
The icon for your need is shown on the path tracer that guides you towards your need. Hopefully making it extra explicit what that tracer is.
Need Icon at World Location
Similar to the original Morbus, you see a need icon floating on your screen, positioned to the world position of where you need to go to do your need
World Info prompts
When you actually get to the place you need to do your need, it will pop up with a world info display, just like with items, players, or bodies, with a prompt to “complete your need”
If all this fails
We’ll see how this lands. We might need to add some text under the need bar on the HUD, “Follow the path to complete your need” or something like that.
Beyond that, idk maybe a tutorial or a dialogue that pops open and you have to click “okay” on it or “Do not show again”.
Maybe I can hide tutorial prompts in the inventory menu and show a little HUD element to tell the player to press the inventory button to see them.
There’s been some discussion in the Morbus Discord lately about grenades. A leading thought is that the explosive grenades are too favorable for aliens, specifically brood aliens. This is a pretty valid point, the explosive grenade allows a brood alien to chuck it into a room and inflict damage outside of line-of-sight (LOS) from humans.
This sucks a bit as a human and i’m not a super big fan of aliens having a strong ranged attack. But on the other hand, I’m torn because I also think this could be useful for Brood Aliens in certain situations where humans are camping in a room and you want to jostle them around a bit.
I think the long detonation delay is helpful for humans to scramble out of range from the grenade, but it also allows aliens to do the same.
The fantasy behind the explosive grenade in the first place is that it’s a tool to chuck into pursuing or oncoming aliens to weaken/damage/kill some of them. Or it forces them to back off for a moment to avoid the explosion damage. It’s not a primary killing tool, it’s utility. For a brood alien it would be to sow chaos in a room and create confusion to hopefully be able to take advantage of that confusion.
Some Balancing
I’ve decided to lower the max grenade damage from 150 -> 100, HOWEVER, the grenade is now 2x more effective against swarm aliens, and 1.5x more effective against brood aliens (in alien form.)
The grenade should be lethal against swarm aliens but not be so lethal against humans. Brood aliens typically shouldn’t be getting hit by a grenade because they should be able to run out of range really fast, but in case they do get hit, they should be punished hard.
Fire Grenades
A grenade that would be very helpful for humans is one that creates an area of denial. Being able to throw a grenade in a tight hallway or doorway to block aliens from passing through it would be incredibly helpful.
So I’ve made an incendiary grenade that does just that. Aliens take extra damage from the fire; 2x for swarms and 1.5x for brood aliens.
The Alien Angle
This is a powerful tool for humans, so I wanted to create a direct use for brood aliens using this grenade.
If a dead body is lit on fire then it enters a “burning” state. After 5 seconds of burning it becomes fully burned. When a body is burned you can’t tell who the body belongs to anymore, thus you’re no longer able to mark them as a verified alien.
Finished this week out strong with a new item, some new models, a new gun, and a cool new feature.
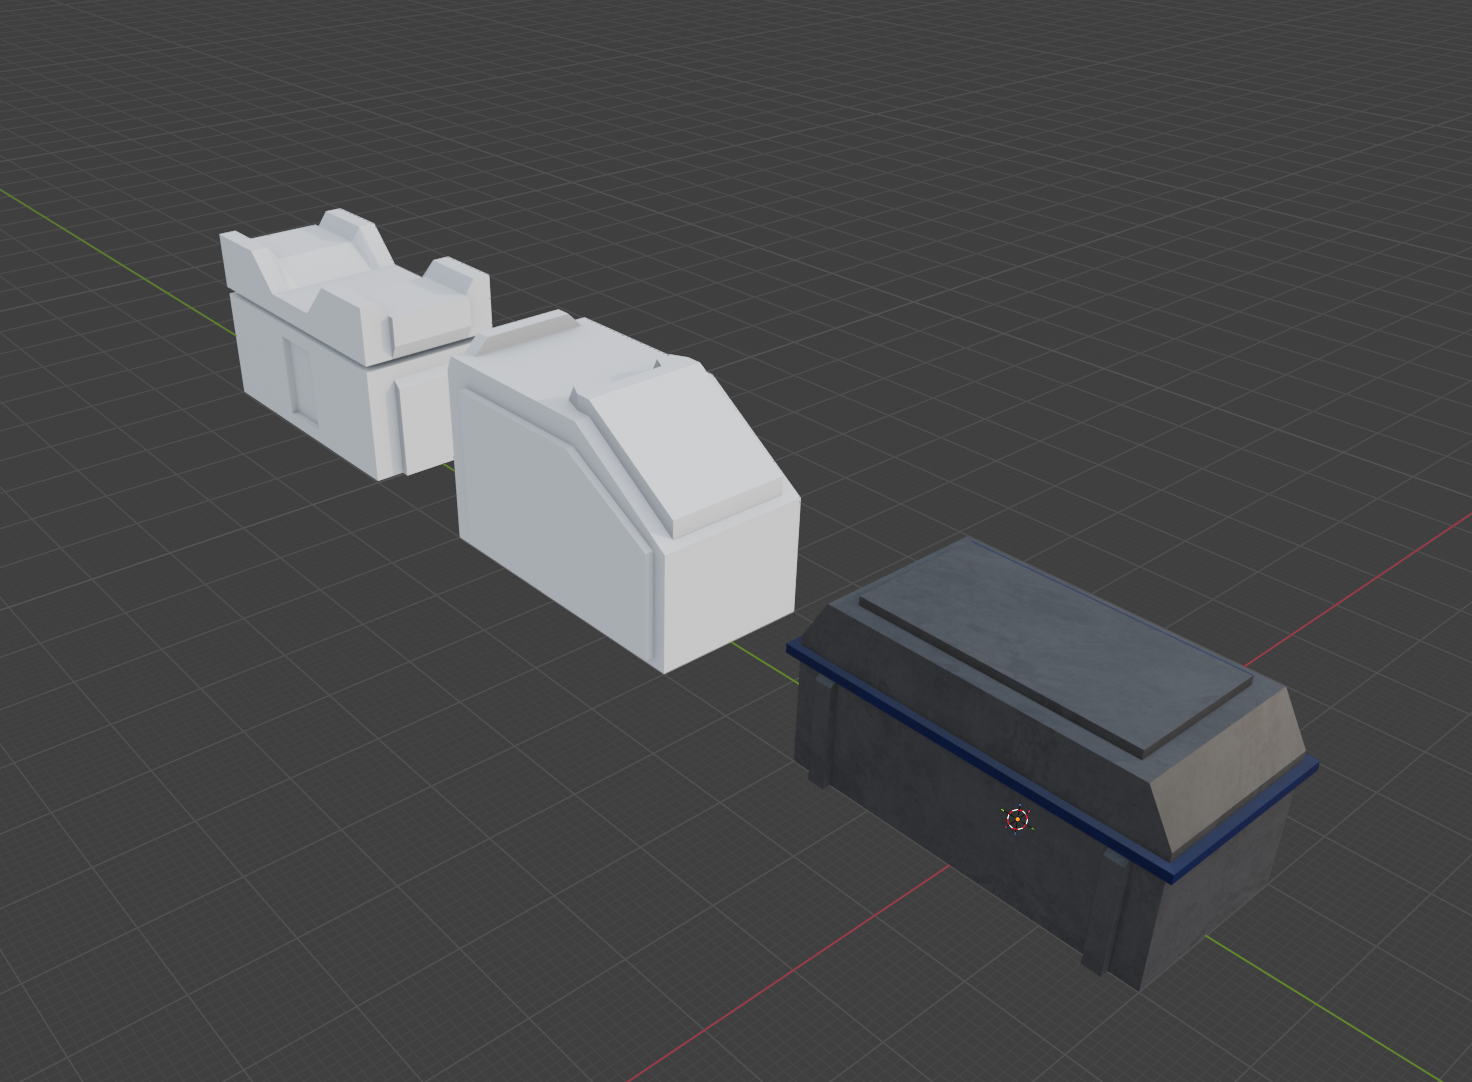
Ammo Models
I was using some generic ammo box models from the Workshop for ammo boxes. They were never meant to be a long term solution and when I started implementing a new gun I decided it was time to get some new cohesive models.
I browsed some online marketplaces and couldn’t find any premade ammo boxes that I thought fit the aesthetic I was looking for, so I decided to model some of my own.
I got about 10 minutes into modelling and then started to become concerned that I wasn’t going to be able to pull it off. When I finished the topology and started texturing them I really knew I wasn’t going to be able to do it.
Like, how do people texture things? How do they do it remotely well??
Anyways this is what I made before I gave up
I think the center one and the furthest left one aren’t bad. The right most one doesn’t quite match though. Through this exercise I realized it’s not exactly easy to make a thematic and visually distinctive ammo box. How do you make 3-4 different boxes that are distinctive but also not too busy?
Defeat
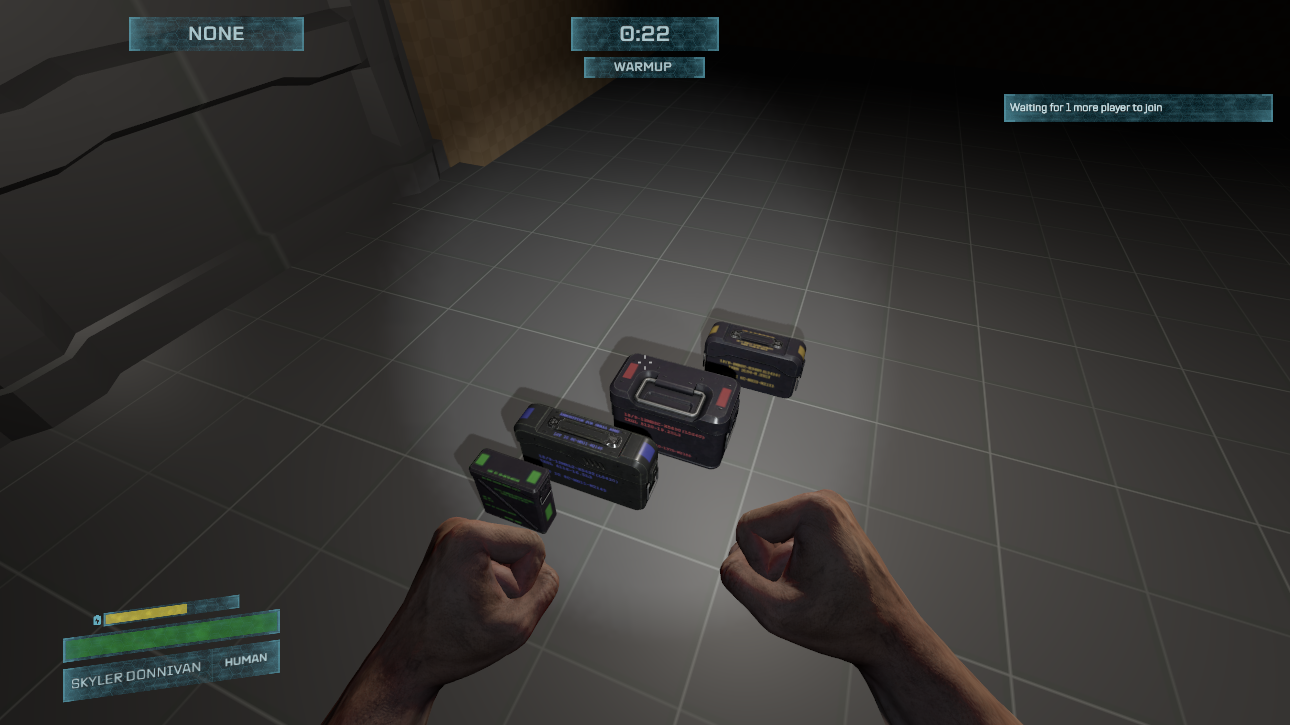
I decided that buying some would be the best idea and try to finagle them to work in the theme. This is what we ended up with
I did some color modifications to the original textures, turning the boxes a dark slate vs an army green. I also then changed the text colors to match the “type” of ammo, as well as colored squares to match that type as well.
Green = Small Ammo Blue = Medium Ammo Red = Heavy Ammo Yellow = Shotgun Ammo
M700
I wanted another gun, and there’s one more in the Facepunch FPS weapon library that I haven’t used yet, the M700, so I decided to port it over.
I’ve done this so many times now that it was trivial to do. What took a bit longer was adjusting the recoil, spread, and other factors to make it feel like how I wanted it to. The purpose of this gun in my head is a “marksman rifle.” It should reward accurate, timed shots, but penalize run and gunning.
To accomplish this I implemented a new “Moving Penalty Multiplier” into the weapon base. All guns have a 1.0x which means moving has 1.0x effect on spread/recoil/accuracy. But the M700 has a 2.0x penalty so moving has 2x the affect on overall accuracy.
This is also the first (and only right now) gun to use heavy ammo. Making it’s ammo potentially a bit more scarce on the map. I’m excited to see how this gun will do in playtests.
Health Vials
The medkit is a medium sized item so it takes 2 slots in your inventory. I want players to be able to have a “smaller” healing item which is less effective than the honker medkit, for instance this would enable a SMG + Rifle + Healing Item loadout.
I didn’t want to make a smaller medkit, so instead this healing item works a bit differently. Where the medkit has a large charge and it’s usage heals over time, the health vial is a single use and provides an instant healing effect.
I’ve buffed the charge of the medkit to heal a total of 120 HP before running out of charge. It heals other players at rate of 10HP/s while it will heal the user at a 3HP/s rate (I like to reward cooperative play.)
Meanwhile the new health vial will instantly heal 40 HP after a short delay. If you’re using the health vial on yourself the delay is 3 seconds, while using it on someone else the delay is only 1 second.
Inventory on player bodies
If you read the Inventory System blog post you’ll have seen my little drawing of how I explain my thoughts around the inventory slots and where the items would physically go on a player’s body.
These places
I wanted to do something fun and cool today so I decided to try and make it so the items in a player’s inventory slots would physically show up on their body in the game world.
It was surprisingly easy to do and without very much tweaking it looks not too bad either. Here’s a video showing a lot of different combinations. The 3rd person camera is just for testing to see what other players will see.
Just an image
This isn’t a gameplay critical feature so i’ll probably add a setting to disable it (for performance reasons.)
This is going to be a shorter blog post because we’re gearing up for our playtest and we’re a bit behind on these posts.
Crew Menu
In the original Morbus when you opened your scoreboard you could mark players with a tag. Something like “Friend” “Suspicious” “Alien” and when you looked at the player in the world, that tag would be shown next to their name.
This made it so you could leave notes for yourself, making it easier to remember who you trust and who you don’t.
This iteration of Morbus needed something like this, but instead of calling it a “score board” i’m calling it the “Crew” menu.
There was also the ability to “mark” a dead body, tagging that player as an alien for you and other nearby players. If you find a dead body you can know for certain that player is an alien now (either swarm or brood.)
Improvements
There are a couple things I wanted to iterate and improve from the original Morbus.
Each tag has a little icon associated with it. This icon shows up on the scoreboard aka “crew menu” as well as on the little nametag display you see when looking at them.
A tag that’s related to aliens makes the whole row for that player red, making it very easy to see they’re an alien. When you look at them in the game their name tag is also in red.
If you mark a dead body, they show up on the scoreboard as a “verified alien” now too. Making it crystal clear that if you encounter this player they’re for sure an alien and you should shoot them.
Last Seen
There is also a “Last Seen” column on the crew list. Whenever you see a player the counter resets, and starts counting up. This will help you remember how long it’s been since you saw someone last.
Status Effects
There’s temporary effects that need to be communicated to the player. For instance if you are a brood alien and you recently transformed into your alien form, you have a cooldown before you can transform back into your alien form.
This isn’t always clear to players that they cannot transform back. In the original Morbus the “alien” icon in the need section of their hud disappeared while this cooldown was active. I never liked this solution since it’s a bit ambiguous.
I’ve added a sort of “Status Effect” system where players can be afflicted with Status Effects. These effects can be time based too, expiring after an amount of time. In the case of this Brood Transformation cooldown, it’s now a status effect that lasts 6 seconds. While you have the status effect you cannot transform back into brood alien form (though you can transform out of it.)
The status effect is shown on your hud, and if you open your inventory you can mouse over the status effect to see a tooltip explaining what it does.
Glowsticks are an iconic part of Morbus. I don’t know when or how I came up with the idea back in the day but I just love them so much.
Grenades are kind of silly and a bit mixed in usefulness. The idea is that you could chuck it at a group of swarm aliens, or some aliens chasing you and it possibly take some out or buy you some time.
Glowsticks
We’ve got the standard 3 types of glowsticks, Normal (green), Sticky (Orange), and Anti-Grav (blue)
You can also break them like in the original Morbus, but instead of it being by pressing E on them you either have to punch or shoot them (or swipe if you’re an alien.)
There’s some cool little colored droplets that shoot out when you break them, and it leaves behind a little splatter of glow in the dark goo. This goo still emits a bit of light for a time being before the light fades away.
Explosive Grenade
The classic explosive grenade. I wanted to keep the “Look out!” voice line that plays when you toss a grenade. The original used Half Life 2 voice lines so we have some more modern ones now.
The grenade also makes a scary little beeping noise so you know where it is, as well as a flashing light on it.
Other Grenades?
I was thinking that an incendiary grenade, like a molotov cocktail from Counter Strike, could be very helpful for humans. The particle effects for this are going to be a bit tougher so I’m holding off on it for now.
A cryo grenade could also be cool. It freezes nearby victims and slows if you’re further away.
Flashbangs and smoke grenades seem useless for humans to use, though a Brood Alien tossing a flashbang into a room and then transforming would be very cheeky, which makes me kind of love it so maybe we’ll see a flashbang get added.
Other stuff
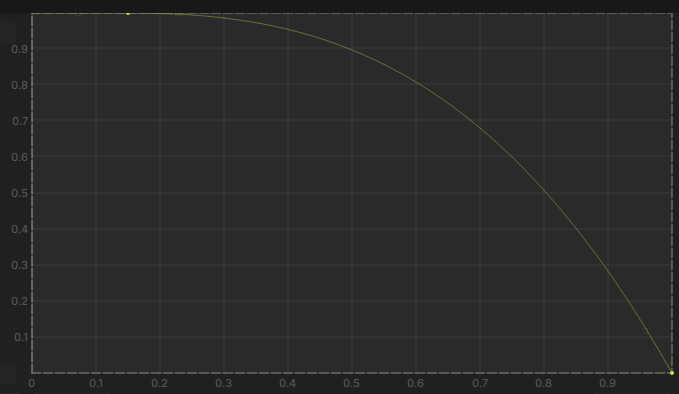
I’ve been tweaking guns a bit more lately. I’ve added damage fall off as bullets travel. Most of them are are an ease out curve that looks like this:
Within 15% of max range the bullet does full damage, then it slowly decreases. At 50% of max range it does 90% damage, but then rapidly starts to decrease, doing only 50% damage at 80% range.
In most situations this won’t make a difference. In the chemical labs map shooting down pretty much the longest hallway with a pistol the bullets do ~80% damage and a rifle does 95%. Shotguns on the other hand are greatly nerfed at that range doing only 50% damage.
There’s also accuracy penalties on movement now. Moving increases spread and recoil, jumping even more so, while crouching reduces spread and recoil.
Spread will also bloom more when you’re moving, making moving and shooting very quickly lead to inaccurate shooting.
What’s next
We have a lot of the core mechanics in and we’re pretty much ready for our first playtest next week. I’ve started working on the “scoreboard” and hammering out any bugs I find with networking. I’ve added a little bot system so I can more easily test things like round and player states with fake players.