Category: Progress

  • Lots of little treats

    Finished this week out strong with a new item, some new models, a new gun, and a cool new feature.

    Ammo Models

    I was using some generic ammo box models from the Workshop for ammo boxes. They were never meant to be a long term solution and when I started implementing a new gun I decided it was time to get some new cohesive models.

    I browsed some online marketplaces and couldn’t find any premade ammo boxes that I thought fit the aesthetic I was looking for, so I decided to model some of my own.

    I got about 10 minutes into modelling and then started to become concerned that I wasn’t going to be able to pull it off. When I finished the topology and started texturing them I really knew I wasn’t going to be able to do it.

    Like, how do people texture things? How do they do it remotely well??

    Anyways this is what I made before I gave up
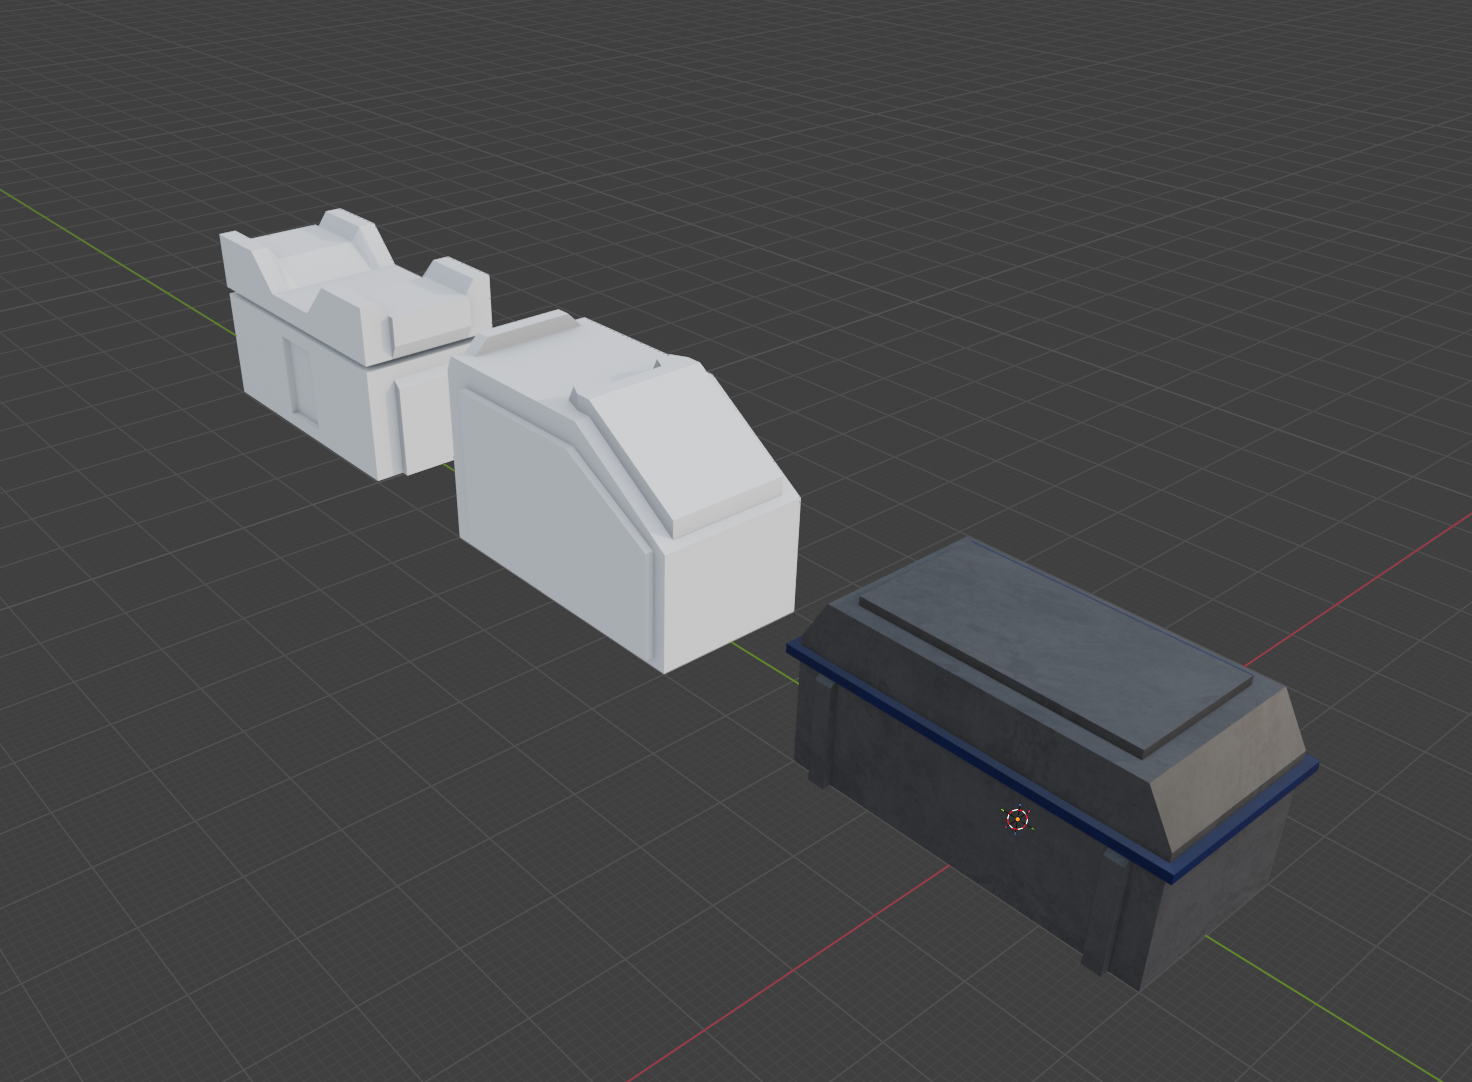
    I think the center one and the furthest left one aren’t bad. The right most one doesn’t quite match though. Through this exercise I realized it’s not exactly easy to make a thematic and visually distinctive ammo box. How do you make 3-4 different boxes that are distinctive but also not too busy?

    Defeat

    I decided that buying some would be the best idea and try to finagle them to work in the theme. This is what we ended up with
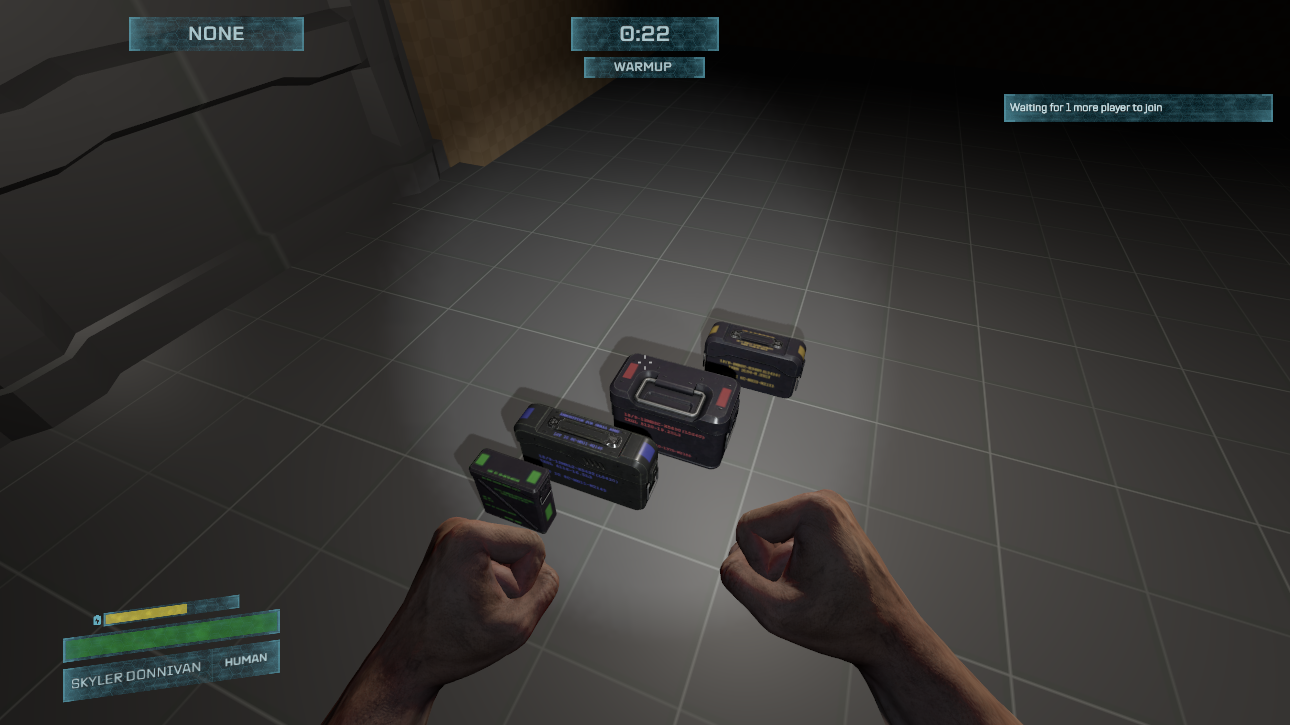
    I did some color modifications to the original textures, turning the boxes a dark slate vs an army green. I also then changed the text colors to match the “type” of ammo, as well as colored squares to match that type as well.

    Green = Small Ammo
    Blue = Medium Ammo
    Red = Heavy Ammo
    Yellow = Shotgun Ammo

    M700

    I wanted another gun, and there’s one more in the Facepunch FPS weapon library that I haven’t used yet, the M700, so I decided to port it over.

    I’ve done this so many times now that it was trivial to do. What took a bit longer was adjusting the recoil, spread, and other factors to make it feel like how I wanted it to. The purpose of this gun in my head is a “marksman rifle.” It should reward accurate, timed shots, but penalize run and gunning.

    To accomplish this I implemented a new “Moving Penalty Multiplier” into the weapon base. All guns have a 1.0x which means moving has 1.0x effect on spread/recoil/accuracy. But the M700 has a 2.0x penalty so moving has 2x the affect on overall accuracy.

    This is also the first (and only right now) gun to use heavy ammo. Making it’s ammo potentially a bit more scarce on the map. I’m excited to see how this gun will do in playtests.

    Health Vials

    The medkit is a medium sized item so it takes 2 slots in your inventory. I want players to be able to have a “smaller” healing item which is less effective than the honker medkit, for instance this would enable a SMG + Rifle + Healing Item loadout.

    I didn’t want to make a smaller medkit, so instead this healing item works a bit differently. Where the medkit has a large charge and it’s usage heals over time, the health vial is a single use and provides an instant healing effect.

    I’ve buffed the charge of the medkit to heal a total of 120 HP before running out of charge. It heals other players at rate of 10HP/s while it will heal the user at a 3HP/s rate (I like to reward cooperative play.)

    Meanwhile the new health vial will instantly heal 40 HP after a short delay. If you’re using the health vial on yourself the delay is 3 seconds, while using it on someone else the delay is only 1 second.

    Inventory on player bodies

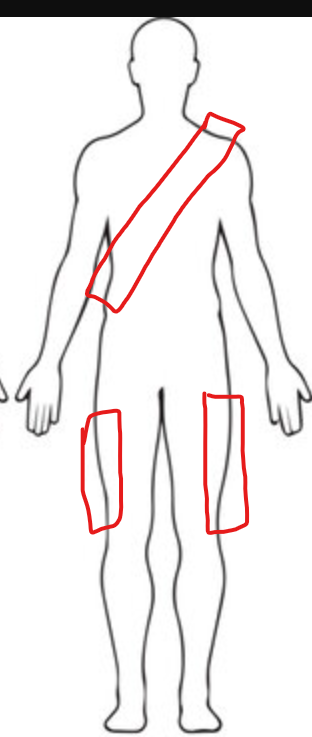
    If you read the Inventory System blog post you’ll have seen my little drawing of how I explain my thoughts around the inventory slots and where the items would physically go on a player’s body.
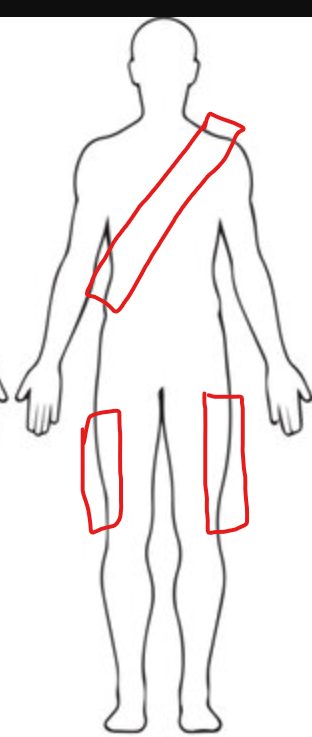
    These places

    I wanted to do something fun and cool today so I decided to try and make it so the items in a player’s inventory slots would physically show up on their body in the game world.

    It was surprisingly easy to do and without very much tweaking it looks not too bad either. Here’s a video showing a lot of different combinations. The 3rd person camera is just for testing to see what other players will see.
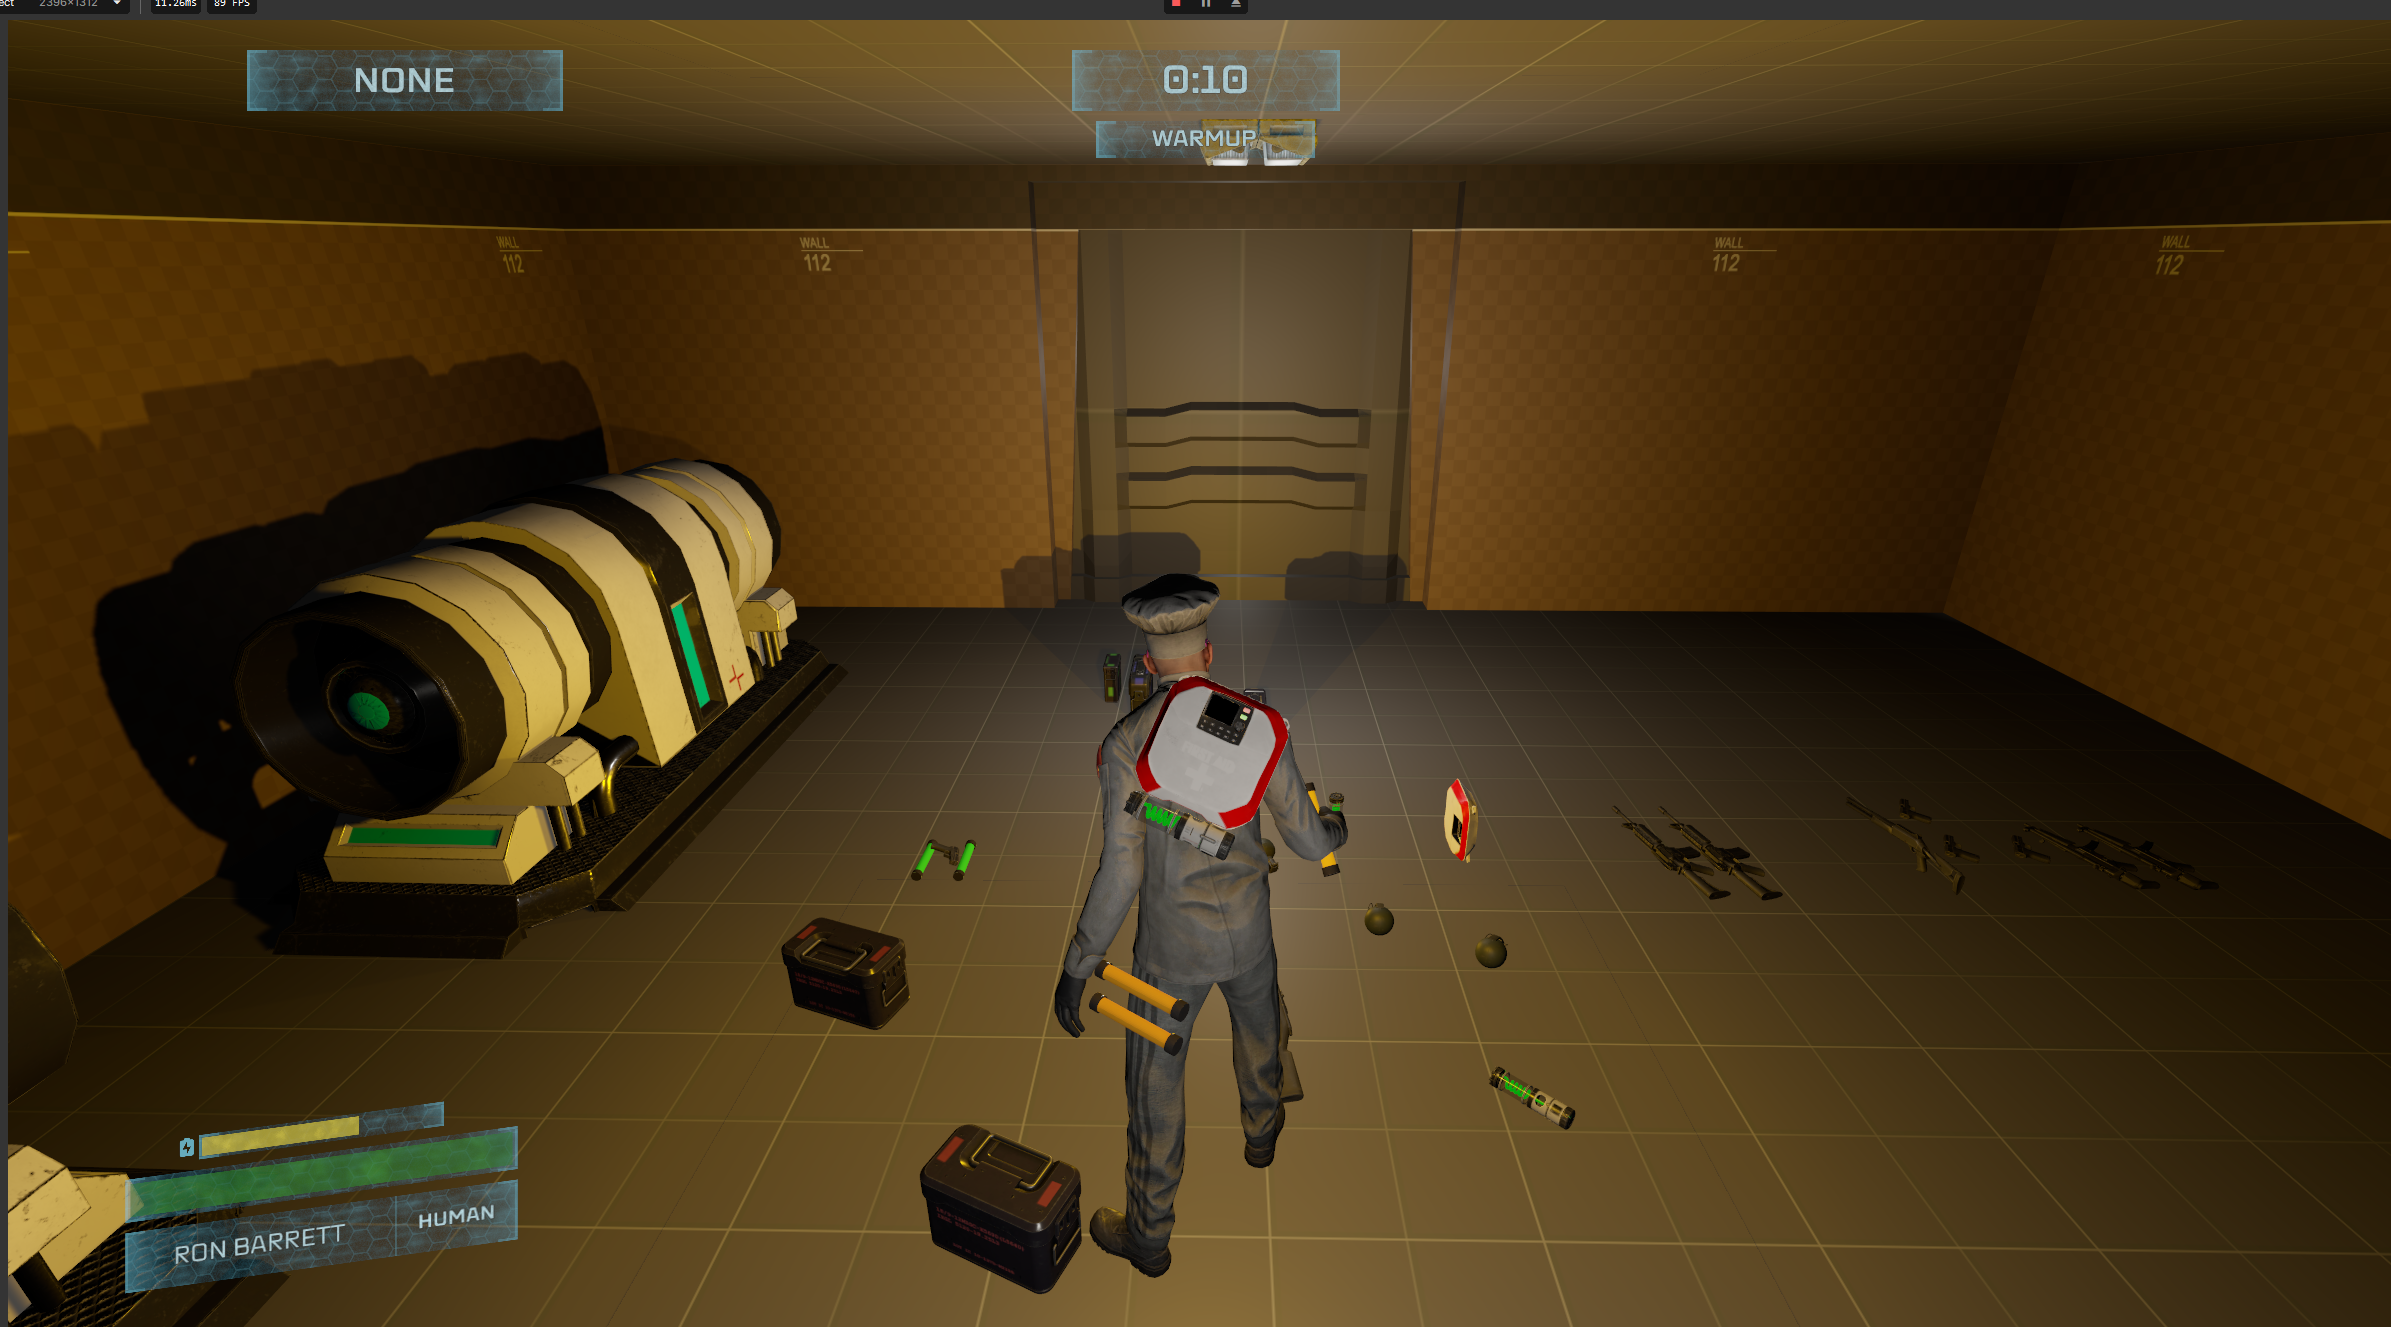
    This isn’t a gameplay critical feature so i’ll probably add a setting to disable it (for performance reasons.)
  • Crew Menu and Status Effects

    This is going to be a shorter blog post because we’re gearing up for our playtest and we’re a bit behind on these posts.

    Crew Menu

    In the original Morbus when you opened your scoreboard you could mark players with a tag. Something like “Friend” “Suspicious” “Alien” and when you looked at the player in the world, that tag would be shown next to their name.

    This made it so you could leave notes for yourself, making it easier to remember who you trust and who you don’t.

    This iteration of Morbus needed something like this, but instead of calling it a “score board” i’m calling it the “Crew” menu.

    There was also the ability to “mark” a dead body, tagging that player as an alien for you and other nearby players. If you find a dead body you can know for certain that player is an alien now (either swarm or brood.)

    Improvements

    There are a couple things I wanted to iterate and improve from the original Morbus.

    Each tag has a little icon associated with it. This icon shows up on the scoreboard aka “crew menu” as well as on the little nametag display you see when looking at them.

    A tag that’s related to aliens makes the whole row for that player red, making it very easy to see they’re an alien. When you look at them in the game their name tag is also in red.

    If you mark a dead body, they show up on the scoreboard as a “verified alien” now too. Making it crystal clear that if you encounter this player they’re for sure an alien and you should shoot them.

    Last Seen

    There is also a “Last Seen” column on the crew list. Whenever you see a player the counter resets, and starts counting up. This will help you remember how long it’s been since you saw someone last.

    Status Effects

    There’s temporary effects that need to be communicated to the player. For instance if you are a brood alien and you recently transformed into your alien form, you have a cooldown before you can transform back into your alien form.

    This isn’t always clear to players that they cannot transform back. In the original Morbus the “alien” icon in the need section of their hud disappeared while this cooldown was active. I never liked this solution since it’s a bit ambiguous.

    I’ve added a sort of “Status Effect” system where players can be afflicted with Status Effects. These effects can be time based too, expiring after an amount of time. In the case of this Brood Transformation cooldown, it’s now a status effect that lasts 6 seconds. While you have the status effect you cannot transform back into brood alien form (though you can transform out of it.)

    The status effect is shown on your hud, and if you open your inventory you can mouse over the status effect to see a tooltip explaining what it does.

  • Glowsticks and Grenades

    Glowsticks are an iconic part of Morbus. I don’t know when or how I came up with the idea back in the day but I just love them so much.

    Grenades are kind of silly and a bit mixed in usefulness. The idea is that you could chuck it at a group of swarm aliens, or some aliens chasing you and it possibly take some out or buy you some time.

    Glowsticks

    We’ve got the standard 3 types of glowsticks, Normal (green), Sticky (Orange), and Anti-Grav (blue)

    You can also break them like in the original Morbus, but instead of it being by pressing E on them you either have to punch or shoot them (or swipe if you’re an alien.)

    There’s some cool little colored droplets that shoot out when you break them, and it leaves behind a little splatter of glow in the dark goo. This goo still emits a bit of light for a time being before the light fades away.

    Explosive Grenade

    The classic explosive grenade. I wanted to keep the “Look out!” voice line that plays when you toss a grenade. The original used Half Life 2 voice lines so we have some more modern ones now.

    The grenade also makes a scary little beeping noise so you know where it is, as well as a flashing light on it.

    Other Grenades?

    I was thinking that an incendiary grenade, like a molotov cocktail from Counter Strike, could be very helpful for humans. The particle effects for this are going to be a bit tougher so I’m holding off on it for now.

    A cryo grenade could also be cool. It freezes nearby victims and slows if you’re further away.

    Flashbangs and smoke grenades seem useless for humans to use, though a Brood Alien tossing a flashbang into a room and then transforming would be very cheeky, which makes me kind of love it so maybe we’ll see a flashbang get added.

    Other stuff

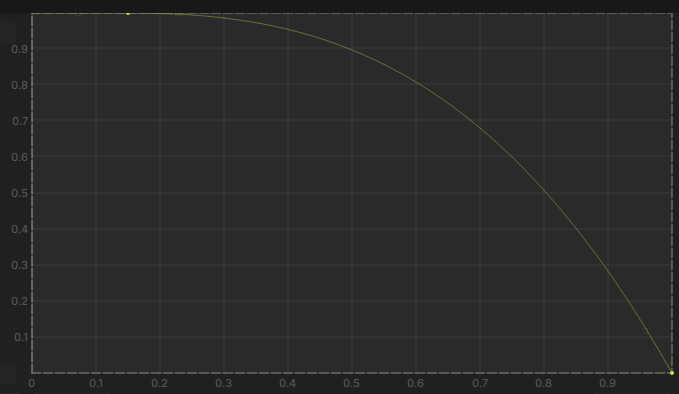
    I’ve been tweaking guns a bit more lately. I’ve added damage fall off as bullets travel. Most of them are are an ease out curve that looks like this:

    Within 15% of max range the bullet does full damage, then it slowly decreases. At 50% of max range it does 90% damage, but then rapidly starts to decrease, doing only 50% damage at 80% range.

    In most situations this won’t make a difference. In the chemical labs map shooting down pretty much the longest hallway with a pistol the bullets do ~80% damage and a rifle does 95%. Shotguns on the other hand are greatly nerfed at that range doing only 50% damage.

    There’s also accuracy penalties on movement now. Moving increases spread and recoil, jumping even more so, while crouching reduces spread and recoil.

    Spread will also bloom more when you’re moving, making moving and shooting very quickly lead to inaccurate shooting.

    What’s next

    We have a lot of the core mechanics in and we’re pretty much ready for our first playtest next week. I’ve started working on the “scoreboard” and hammering out any bugs I find with networking. I’ve added a little bot system so I can more easily test things like round and player states with fake players.

  • Inventory System

    It’s been a great week of development so far. I could’ve written a blog post earlier but I haven’t been taking my end of day breaks to write these like I was doing in prior weeks. Anyways, let’s dive in.

    The Past

    The original Morbus was a bit confusing when it came to inventory and weapon slots. You had 6 (?) slots and each slot was for a specific type of weapon.

    Slot 1 Crowbar
    Slot 2 Pistols
    Slot 3 SMG’s
    Slot 4 Rifles
    Slot 5 Utility items
    Slot 6 I think also utility items?

    There were a ton of different guns in Morbus so you’d run up to a gun, try to pick it up, and have zero feedback on why the SR-4 Phaser is actually an SMG and you already have a R22 Automatic Compact SMG in slot 3 so you should go pound sand.

    It also created weird restrictions where you would have to choose between carrying a grenade OR a medkit, and maybe you want both!

    I didn’t want any of this confusion in this iteration of Morbus.

    Requirements and Goals

    I had these principles guide me when designing and inventory system for this version of Morbus

    • Allow flexibility of loadouts
      • I want players to have variation in what they’re carrying around
    • Restrict the number of “big” weapons
      • Ideally a player should only be able to carry a single “big” gun
    • No arbitrary slot restrictions
      • If a slot is for a big gun, then why can’t I put a smaller gun in it?
    • Allow for multiple utility items
      • Grenades+Glowsticks+Medkit+XXX should be possible
    • Simple
      • Needs to be intuitive to learn
    • Strategy
      • Certain loadouts should enable certain strategies

    Where we ended up

    This is an experiment, it’s not final, and playtesting will reveal if it makes sense, BUT, I am pretty happy with things at the moment. Let’s start with a video before we dive into explain it.

    Let’s break down what’s happening;

    0:03 I pick up a pistol, we see me using my scroll wheel where it shows a weapon select where we can see my hands or the pistol

    0:07 I pick up an M4, we see my inventory flash for a moment to show where it ended up in my inventory. And then when I scroll we see a simpler version of just my weapons. Scroll then Left Mouse Button selects the weapon to select it.

    0:15 By pressing Q I open my Inventory Menu. I see 4 “slots”, with slot 1 having my hands, slot 2 having my pistol, then an empty slot 3 with 2 spaces in it, and a Slot 4.

    We can also see next to each Slot a few boxes. These boxes are a secondary representation of the “size” of a slot. We see that Slot 3 is Size 3 so it has 2 spaces in it.

    I drag my pistol from Slot 2 into a space in Slot 3 and then back into Slot 2.

    0:19 I pick up a glowstick and we see it was placed into Slot 3. I readjust my inventory and move both my Pistol and Glowstick into slot 3.

    0:24 I click 3 on my keyboard, which toggles between my Pistol and Glowstick since they are both in Slot 3.

    0:29 I reorganize my inventory so the Pistol is in Slot 2, Glowstick in Slot 3, and M4 in slot4.

    0:35 I walk up to a shotgun with my pistol drawn, I cannot pick it up since I don’t have slot space. When I take my shotgun out I see underneath the nametag “E SWAP” (Hold E to Swap)

    If I tap E it still says “No Slot Space” but if I hold E then i pick up the Shotgun and drop my M4 on the ground.

    0:46 I walk up to a MP5 on the ground. I pull out my glowstick in Slot 3. I then hold E to swap the glowstick out for the MP5.

    The MP5 is 2 sized weapon. We can see in my inventory that Slot 3 is now completely filled.

    0:55 I just continue to swap stuff and mess around with the system for awhile

    1:10 I have a glowstick from Slot 3 selected. Slot 3 is currently filled with two items (size of one) making it completely filled. When I approach an MP5 (size of two) I can hold E to swap.

    This swap will drop BOTH items in Slot 3, picking up the MP5 into Slot 3.

    1:15 You can drag items out of a slot in the inventory view to drop them

    1:23 This is I think the coolest thing ever; I open my inventory menu and then when I mouse over items in range it displays their name.

    I can then click down and drag those items from the world into my inventory slots.

    Why I like this

    I like to base game mechanics off of realism. If I pick up an item in a game, where does it go? Depending on how “realistic” a game is, it could just disappear from existence until you need it, to it goes into your backpack which has finite space and weighs you down.

    On the slider of “not real” to “very real” I want Morbus to be “plausibly real-ish.” I think a horror game is scarier if it’s a bit realistic. If it wasn’t realistic then why would it scare me? How can I relate this experience to my actual life and the danger my actual life would be in if I were in that situation? Or something like that.

    Anyways, this is a long way to say I was thinking one day about “In Morbus, where do weapons in your inventory go?” “Wouldn’t it be cool if they showed up physically in the world on your player model?”

    In Morbus, seeing someone run around with no weapons is big alien energy and could almost warrant an instant shoot on sight. If I were able to visually see another player’s inventory it could give me more evidence on why I should or shouldn’t trust them.

    Okay so if I want to put a players weapons on their character then there’s only so many places we can put weapons.

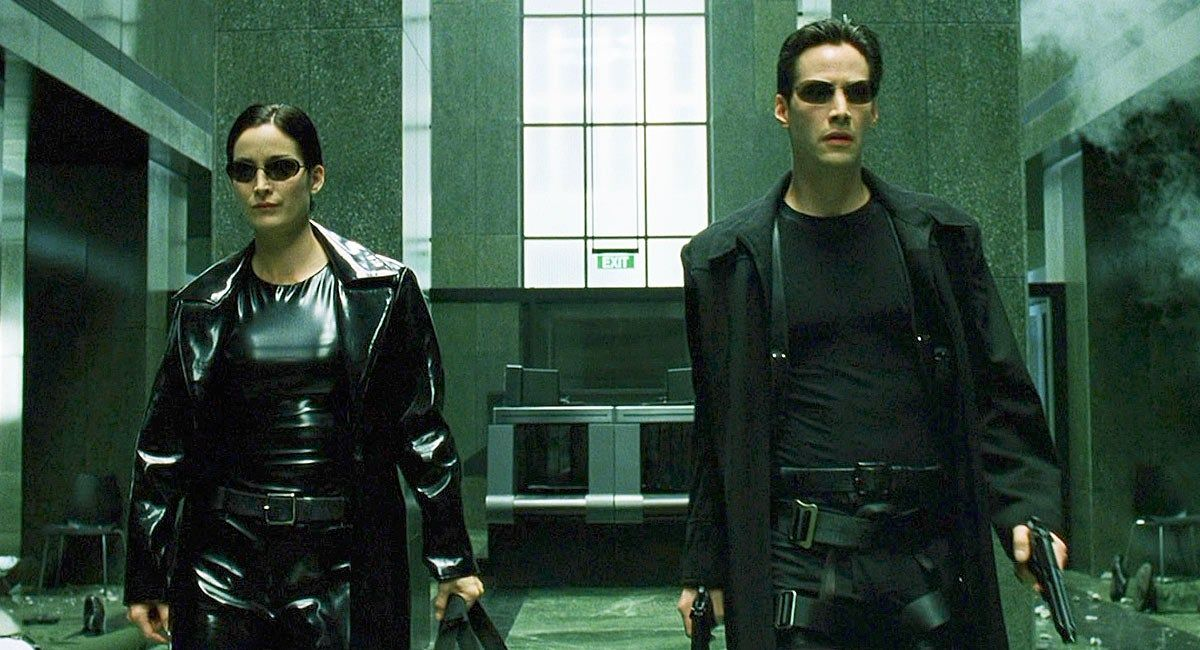
    Unless they’re Neo of course, then they can have like 50

    More realistically I think there are 3 prime places;

    Each thigh and the back.

    To gamify things we can say that one thigh can carry more than the other, and the back can carry the most (big gun) so this breaks down to 3 slots, each of a a different size.

    To keep things simple we say: Small (Thigh) / Medium (Thigh) / Large (Back). And if you get stuck up on the different sized thigh slots, perhaps there’s a perk or a class that gives two Medium sized thigh slots?

    This served as the foundation of this system. Give the player 3 slots, each of a different size; 1, 2, 3.

    Rifles and big guns would be of size 3 so they can only fit in the back slot.

    Pistols and utility items would be of size 1 so they can fit anywhere. If a player wanted a Pistol + Rifle they get 2 utility slots.

    Submachine gun like weapons are size 2. So if a player wanted to have one of those they could have 3 utility slots on their back if they wanted. Or they could have 2 different SMG’s and have 2 utility slots, or 3 if they don’t have a pistol.

    6 “slots” in total, with lots of different ways on how to fill them!

    The most confusing thing is the distinguishment from a “Slot” (Thigh, Other Thigh, Back) and the “Sub Slot”/”Size”/”Space” in each slot which distinguishes what and how much can go in it. I’m still working on terminology but I just call them Slots and Sub Slots right now.

    Right now ammo is free. You can pick up ammo of a type if you have a gun that uses it and there’s an arbitrary limit to how much ammo of each type you can carry. I’m debating whether this should change. Maybe ammo should take slots, maybe you get more slots then?

    Other ideas

    There are a lot of other inventory systems we could explore. This is going to be our “1.0” inventory system to try out. We can throw the whole thing out if it’s too confusing.

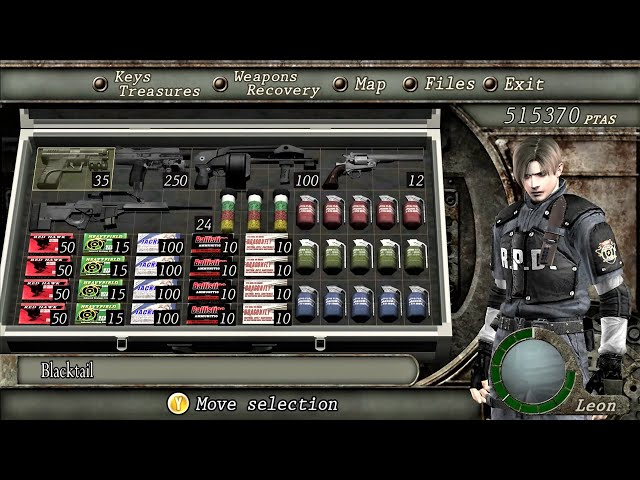
    A “simpler” system could be to do something like give the player a 6 slot grid inventory, then let them organize it and assign items onto hot bars. It’s very RPG like though so i’m not the biggest fan.

    Inventory systems like this are often times slow and cumbersome.

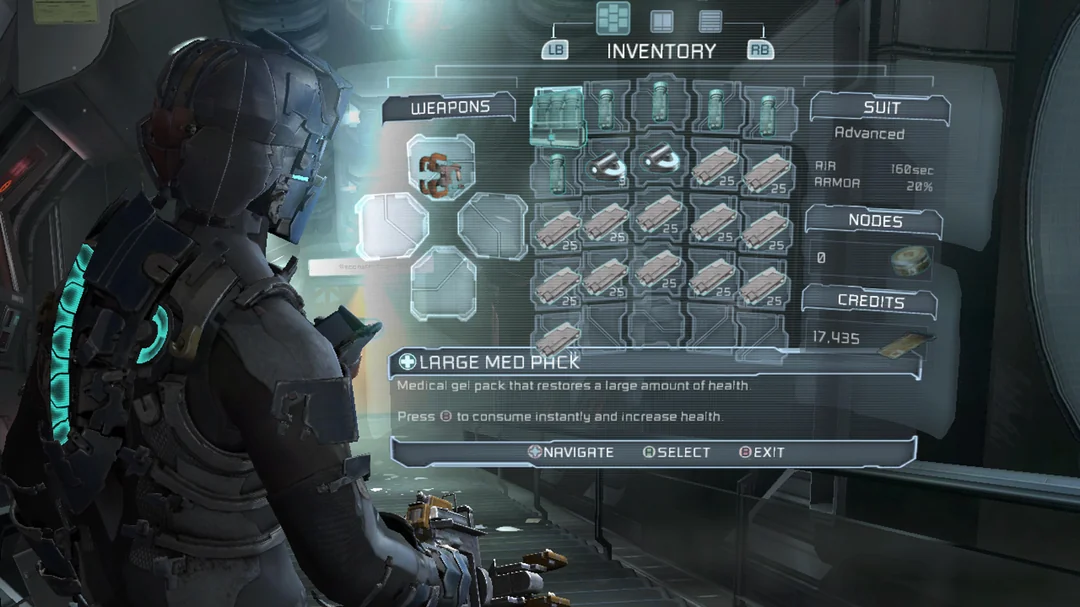
    DeadSpace also did something kind of like this, but you could have 4 weapons and then your inventory was just things like ammo

    Ammo management in DeadSpace was really stressful (and fun.) I’m torn on whether I make ammo a resource you have to carry around and takes up space. It makes inventory more complicated but allows for further expression of strategy for players.

    Weight

    Item weight (that causes your character to slow down) hasn’t been implemented yet. It might just be that weight is based on slot usage, or individual items could have different weight values.

    Conclusion

    I’m excited to see how this inventory system will land with players. I doubt this will be the final iteration of it but I’m excited to take this system into the first playtest.

  • A short week: HUD and Networking

    This week has been a short week of development due to some travel commitments but it’s a week with a lot to show!

    Let’s start with a demo;

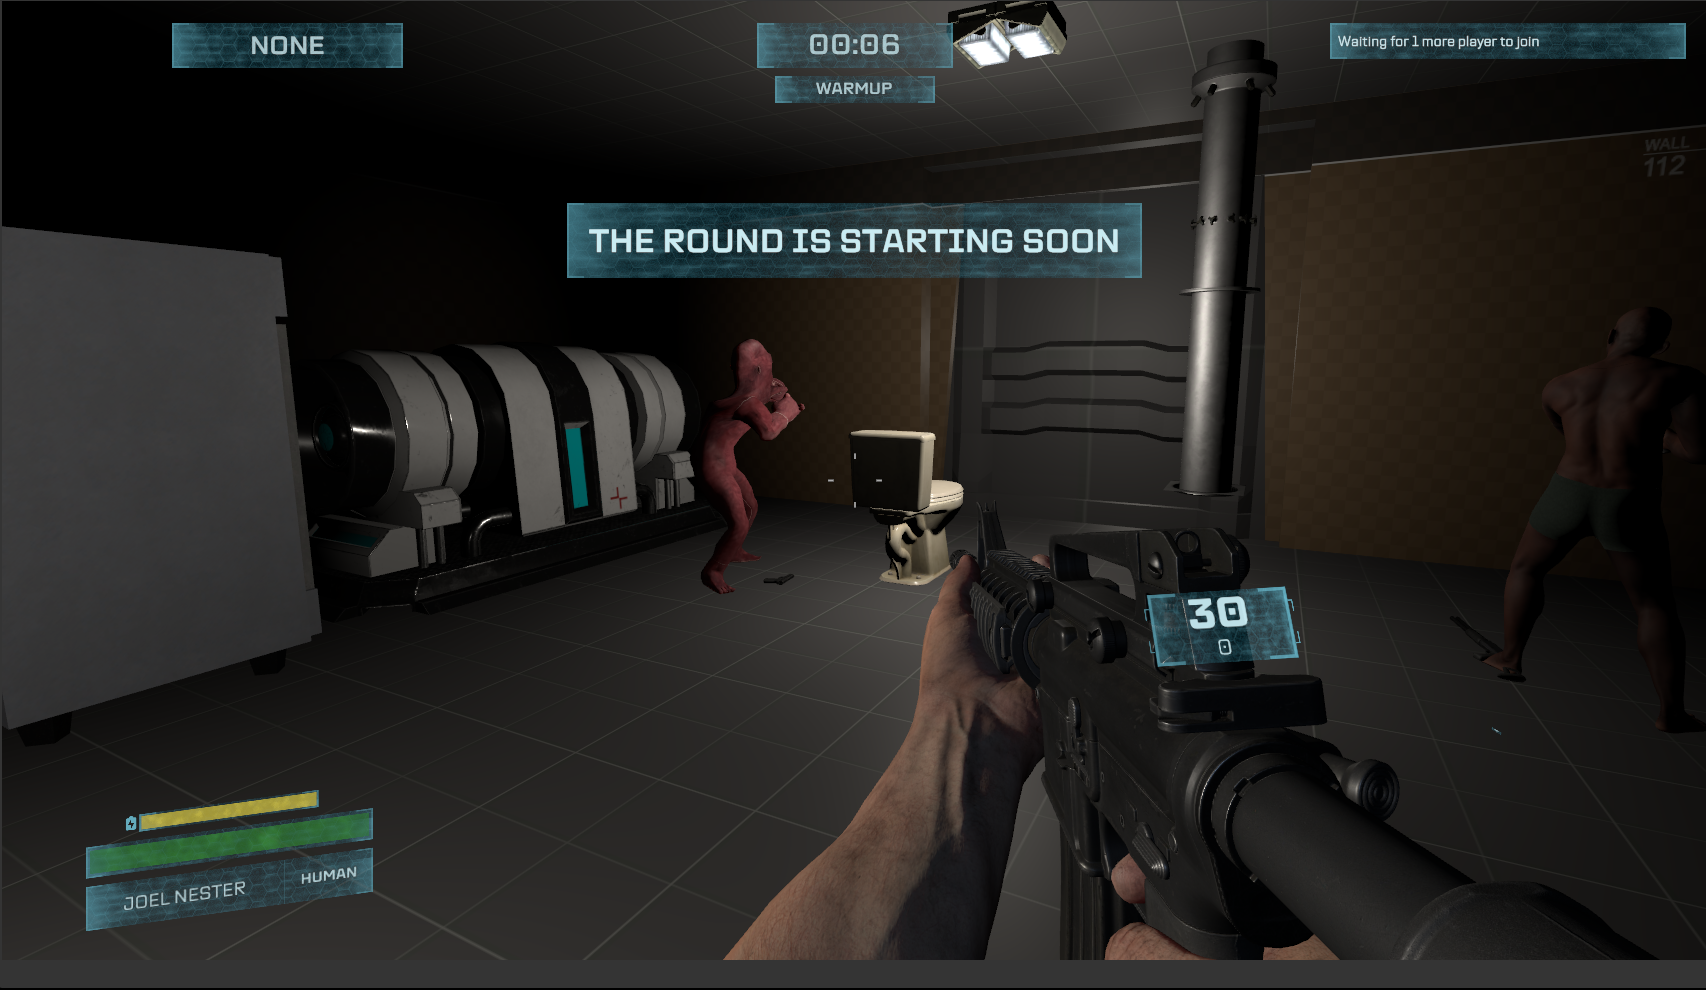
    In this video we can see the HUD coming together, it’s very reminiscent of the original Morbus HUD.

    Ammo Counter

    As mentioned in the last blog post; we’ve got a “holographic panel” connected to the players weapon that shows ammo. This isn’t actually a HUD element in the traditional sense, it’s actually a “World Panel” which is UI rendered onto a plane in the world.

    I made the system to each weapon can define it’s own attachment point, and dimensions of this panel.

    We can see in this video that they’re all in a slightly different place. I’m not sure which looks best yet, so we’ll probably move them around as time goes on.

    Status Section

    This changed a bit from the original Morbus.

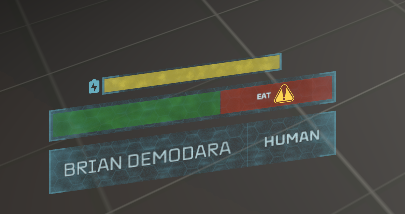
    Instead the 3 bars being; Battery, Health (and Name), Role, we’ve moved the name to the same role bar. I felt like the bottom bar was being under-utilized and there was no need for the role to be so big. I think this looks slicker.

    Without putting the HUD on an actual WorldPanel, which I didn’t want to do (even though i may need to) I tried to emulate the perspective/skew effect that the original Morbus had. It’s not perfect, but it’s okay enough for now.

    The HP bar is a bit smaller now too, but I made it so it would show the amount of health you’ve lost because you haven’t completed your need.

    This health can’t be healed by medkits, and is essentially a damage to your max health. I think I like this over just plain damage and having the additional warning in your HP bar telling you where this damage is coming from could be helpful to newer players.

    Punishing bad Broods

    I also had an epiphany on how to leverage this “need damage” to punish Brood Aliens who kill humans with guns. Right now Brood Aliens who shoot at humans with guns have no damage reduction on their gunshots. This makes removes the ability for a cheeky human to say “shoot me to prove you’re an alien” however, if a Brood Alien kills a human with a gun, they suffer Need damage.

    This need damage can only be healed by successfully killing humans in alien form. Thus the Brood Alien suffers a reduction in max HP as a penalty for killing a human with guns, though they can redeem themselves by infecting other humans.

    Thematically this makes sense to me. A Brood Alien desires to infect humans, if it kills them in a way they cannot spread the infection (guns,) this goes against their desires, and thus causes damage. Whether this damage is mental, psychological, or whatever is up to debate.

    The Top

    The rest is pretty much the same, we’ve got the need area, the timer, round state, and then notifications. All themed to match.

    We might expand upon these later, but they work so why fix what aint broke?

    Announcements

    We can send announcements to players about important things. This is used for things like victory messages or to tell Brood Aliens they’ve suffered need damage for killing a human with a gun.

    Alien Theme

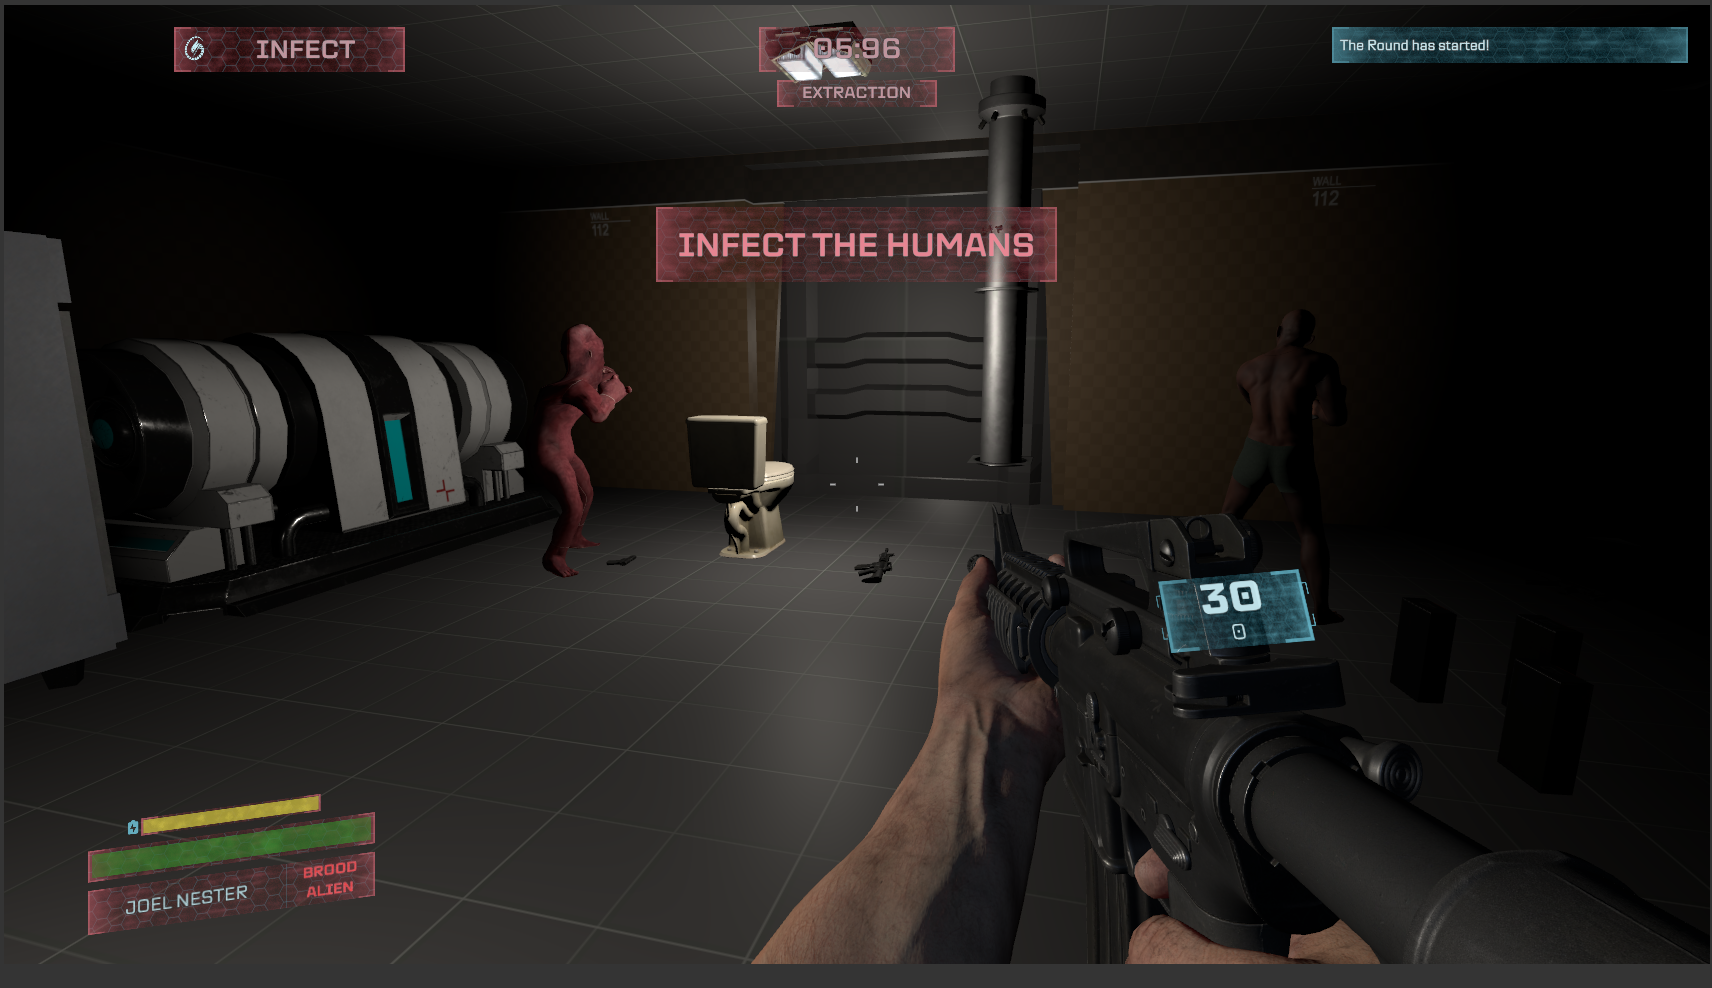
    Aliens get a red themed HUD because they’re dangerous.

    Nametag sounds

    You might have to watch the demo video again to catch this one.

    I wanted to add subtle sound cues and effects with the name tags for items, players, and bodies. Just to add a bit more life to things.

    I’m not sure how I feel about them, they could still be a bit too loud and obnoxious so we’ll have to see how player feedback goes.

    Networking Reworks

    I’ve moved even more systems over to be host authoritative. At this point I don’t any core system is client managed. Health, Needs, and Alien Transformation were the last bits and now that they’ve been handled I think we’re doing good.

    I’m still very concerned about smoothness, I can test in the editor with a local instance faking 100ms lag, and it’s ~okay~ but I still wish it was better. S&Box just doesn’t give us great built in tools to handle these things for us.

    Bonus Content:

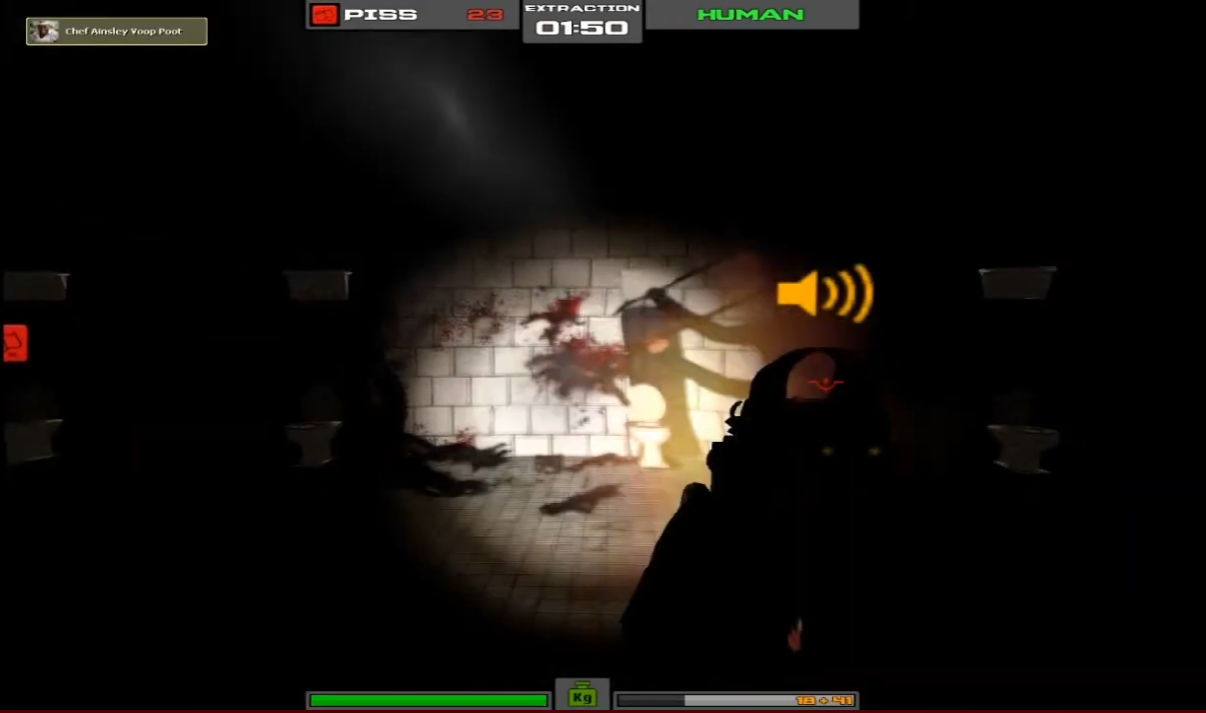
    This is a silly one but M0ji_l in Discord brought up the Morbus HUD evolution so I figured I’d highlight it here:

    June 2011

    We can call this the “wow I made my own HUD” era.

    I hardly knew how to program at this point, and I still sorta remember putting this HUD together. I thought doing the subtle “lighting” effect on the HP bars was so cool,.

    November 2011

    This is the HUD that people actually know if nowadays. I can trace it back as early as late 2011 which was a lot earlier than I thought it would be.

    This HUD was inspired a lot by the ammo counter, which I didn’t actually make myself but was an addon from garrysmod.org which I repurposed for Morbus. I had taken a class on programming, still knew hardly anything, but managed to hack together this HUD.

    What helped was I probably had a much clearer vision of what I wanted, which was holographic, Sci-fi, 3D, visor like.

    May 2026

    Which takes us to today.

    First Playtest

    Okay don’t sue me if this doesn’t happen, but i’m tentatively planning for our first playtest to be 6/8/2026, around 5-8pm Pacific Time.

    It’s going to be rough, but if you’re interested in trying it out I’d be overjoyed to have you play!

    Join the Morbus Discord server here for updates and information on the day of!

  • Guns, Ammo, and Nametags

    There’s been a lot of great progress over the last couple of days; let’s start with the video:

    Item Refactor

    I did a big refactor of the item system. I started thinking about how easy it would be to cheat with the client trusting model I was using. Cheaters make everything harder than it needs to be. So now the item system is host authoritative; only the host can create items and all the clients must request item creation which will be validated by the host based on the circumstance.

    Guns

    There are now 4 guns in the game, I think it’ll stay at this amount until I get real, thematically correct, gun models. Here’s what we have:

    USP – Pistol Archetype

    Classic pistol, light but lacking in power. These will be the most common gun.

    MP5 – SMG Archetype

    Fast firing but eats up ammo, light weight considering it’s fire power. It uses pistol ammo and will be more common than any other stronger gun.

    M4A1 – Rifle Archetype

    Powerful, the bench mark for all other weapons. Will be somewhat uncommon; not everyone will get one.

    SM4 – Shotgun Archetype

    A powerful shotgun, excellent at close range but lacking at distance. Will be just about as uncommon as the M4A1.

    Philosophy

    I want powerful guns to be a bit more scarce than in the original Morbus, but I also want all guns to have some purpose; even a pistol should be able to kill a brood alien (if you get lucky and the brood alien is bad.)

    Ammo

    Minor in the grand scheme of things but ammo now works as intended (reloading uses ammo in your inventory.) You are limited by how much ammo of each type you’re allowed to carry, and if you drop your last gun that uses a specific type of ammo, you drop all your ammo with it.

    Also we have a slick “in world” ammo counter.

    Nametags

    Items and players have nametags when you look at them. I’ve been playing around with how the effect works; you can see a bunch of iterations I made:

    I was considering leaving it as the White/Transparent styling, but the ammo counter is that holographic effect so it seemed like I should keep it consistent instead of mixing styles. We’ll see how it pans out later, this isn’t supposed to be the final HUD.

    So many little tweaks

    I swear whenever i sit down to work on something i’ll find something else that doesn’t quite feel right and needs to be tweaked. There’s lots of little things like repositioning the player flashlights, or creating a world and a view flashlight based on if it’s your own flashlight or someone else’s, or fiddling with the player eye position, that are so small and insignificant that they don’t deserve sections to themselves.

    I’ve also found ~5 bugs in S&Box in the past week which has been a bit annoying, but Github issues have been filed for all of them so hopefully they get sorted out. Whenever I find a bug I typically change my design and plans to not be impacted by the bug. It doesn’t feel great making something that isn’t right, and cannot be right for reasons out of my control.

    Playtest?

    My todo list is getting shorter until the next playtest, we need to finish the basic hud, add in dead bodies, a simple player list, voice chat, victory messages, and place some weapons.

    Then, in theory, we could do a simple playtest to see if any of this will hold together under pressure.

    The pace things are going is pretty good right now, if they keep up we’ll easily have our first playtest by the end of June.

  • Power & Lights

    In the original Morbus, maps often implemented a light switch or generator which would turn off some or all of the lights in the map. In this S&Box iteration I wanted there to be the tools for a lot more control over lights, or more importantly, what powers lights.

    This might mean more than a simple generator with an on/off switch. Perhaps there are relays or circuits which can be broken for specific parts of the map instead of the whole map. I wanted a flexible system that was also fairly simple.

    In this post we’ll be exploring what this system looks like from an architectural and technical perspective, followed by how this looks in game right now.

    Component Architecture

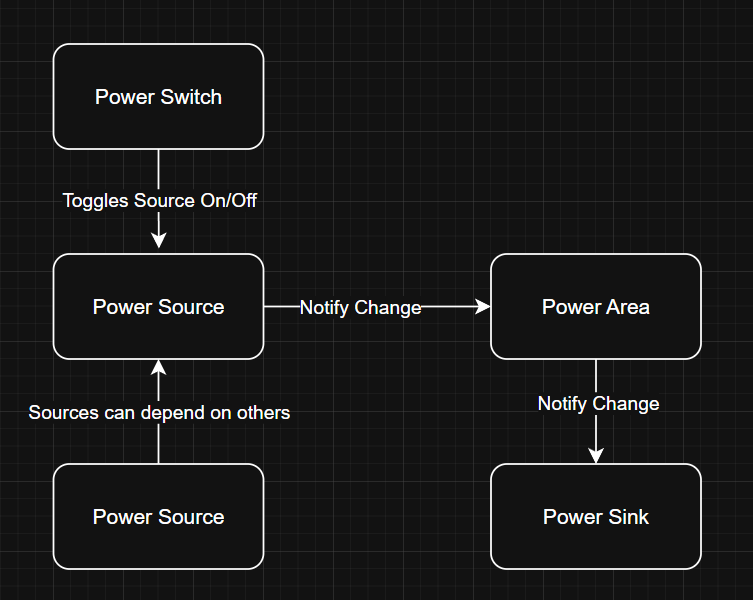
    Let’s first look at relations;

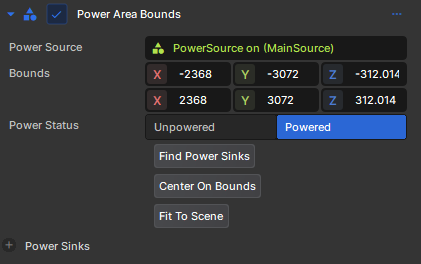
    Power Source

    A power source provides power.

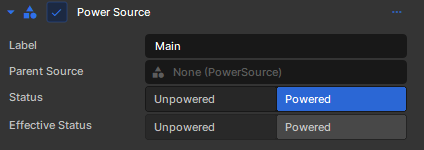
    A power source could have a “parent” power source, if this is the case, the power source is more like a pipe instead of a generator of power; if the parent power source is off, then the child cannot provide power.

    The label is just a friendly name for us.

    The status is the power source itself, whether it’s on (powered) or off (unpowered.)

    The effective status takes into account the parent power source as well.

    Power Sink

    A power sink uses power provided by a power source.

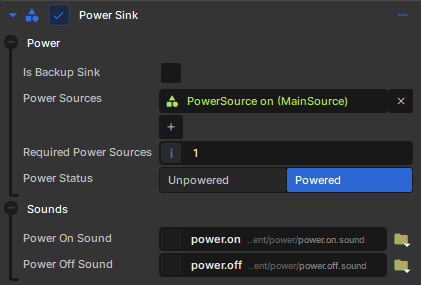
    A power sink could have multiple sources, and it may need more than one source to be powered. If it has enough sources that are powered, then it too is powered.

    A backup sink just means it’s status is inverted. So if the power source is unpowered and we’re a backup sink, then we are powered (think emergency power or backup power.)

    This backup idea could’ve been implemented as a “backup power source” that gets activated when another power source is activated, but that would be more complicated I think.

    Power Area

    A power area is a representation of an area that a power source affects. Think of it as a big box, and any power sink inside of this box will be affected by the power source.

    This also acts as the sort of messenger between power sources and power sinks. I kind of imagine a power area as invisible wiring between a power source and a sink, so it makes sense to have it be the messenger.

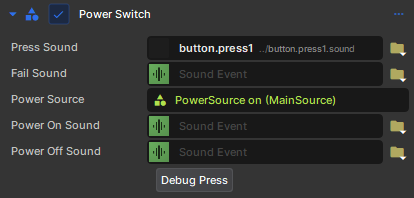
    Power Switch

    Something needs to turn a power source on/off, this is that.

    Players can interact with it and press it, thus toggling a power source.

    Okay so what about lights?

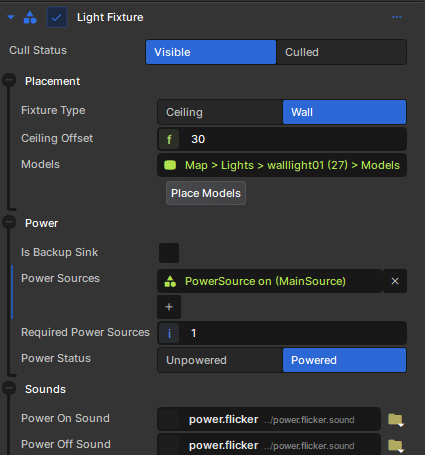
    Lights would be considered a power sink, and I needed something that would translate a power sink changing status (powered <-> unpowered) to light components being enabled/disabled.

    I could’ve solved this translation as a separate component, but instead I decided to make it a derived component called LightFixture.

    Under the hood this LightFixture component will find any child Light components and then enable/disable them based on the power status.

    Cull Status?

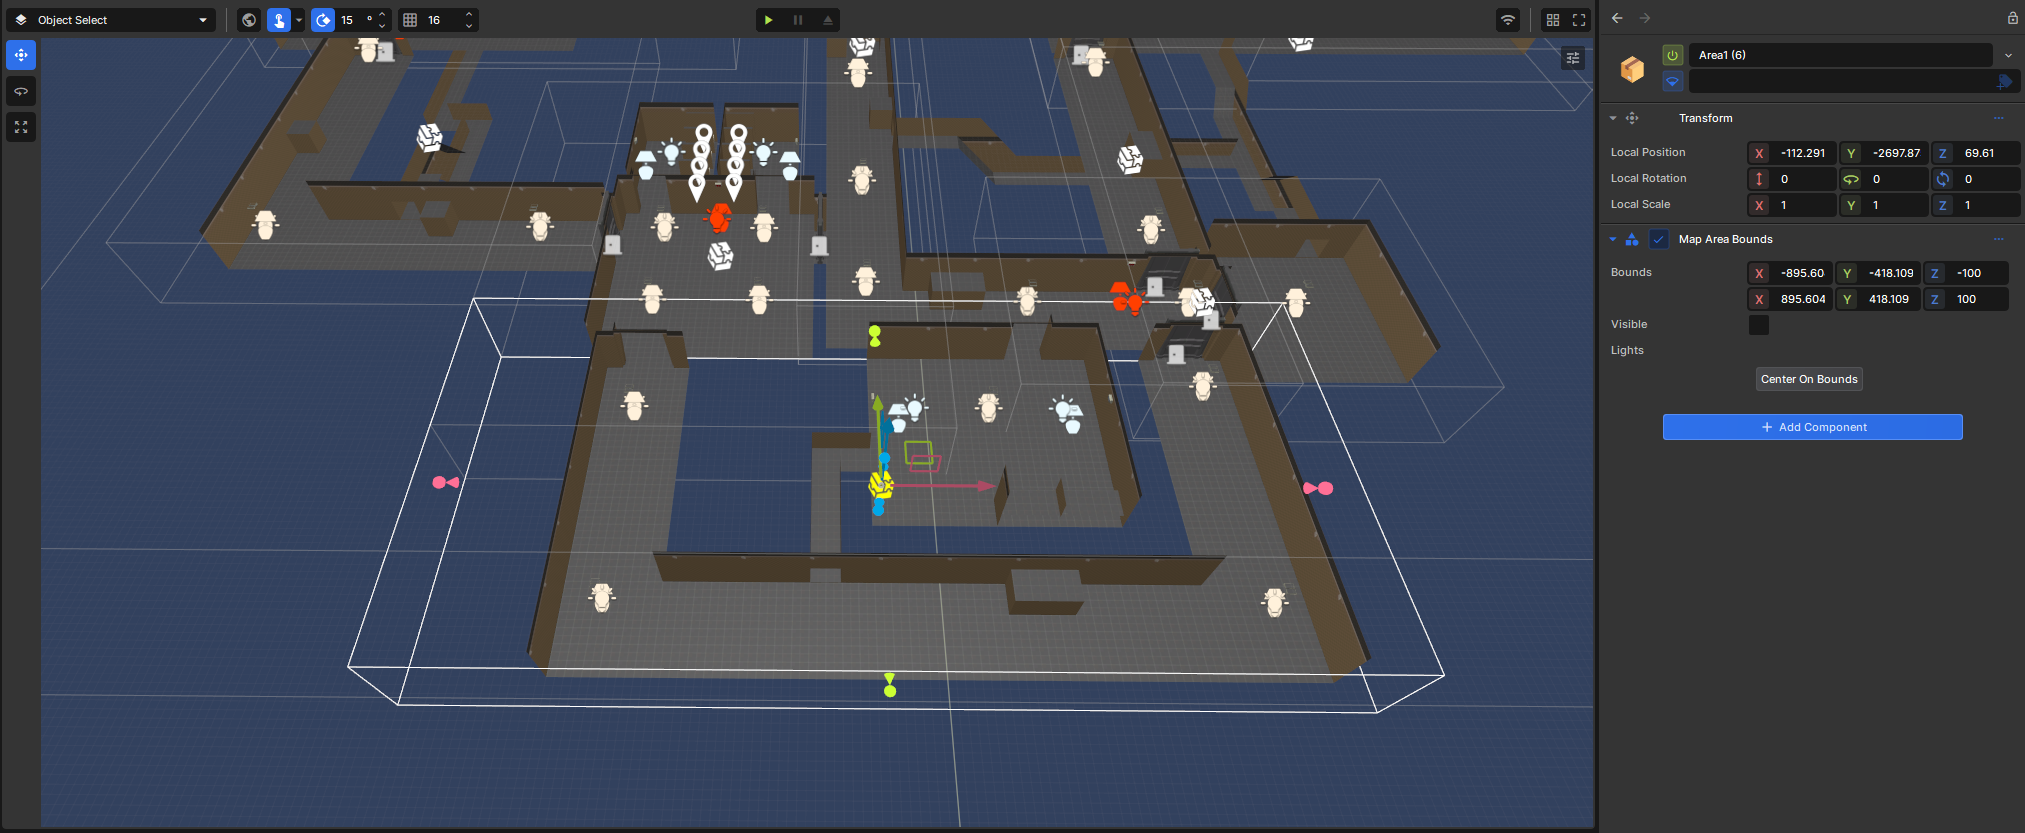
    It seems like S&Box performance is greatly lacking when it comes to automatically culling lights and geometry that aren’t visible. This is very frustrating since you’d figure this would exist by now. To try to improve performance I built a system that would cull lights if I think they aren’t visible to the player.

    I accomplish this by setting up my map with these MapAreaBounds components, which are bounding boxes of specific rooms and sections of lights

    Then every frame I look to see where the player’s camera is aiming. I cast a trace along their aim and see if I will intercept one of these bounding boxes. No collision is used, but since I can figure that in this map the player will never see more than 5000 units in a direction (due to walls and doors) I only trace 5000 units ahead.

    If this trace intercepts a box, then I know that the lights in that area are necessary.

    You can see this system working in this video:

    I could’ve possibly used an angle based approach for this, and I might revisit this later. What I really hope is Facepunch builds something into the engine to handle this.

    Placement?

    Placing stuff manually in an environment kinda sucks. I want to click a button and have my ceiling light automatically placed on the ceiling, or have it placed on a wall a certain number of units from the ceiling.

    This placement section is just tools for me in the editor, I can click a button and it figures out the appropriate place to put the light. The models themselves are child objects so this is easy to do.

    You can see in this video I place a ceiling light, hit a button and it snaps to the ceiling.

    Or with the wall light it casts a series of traces to find the closest wall and then positions the light on the wall for me.

    Material Groups

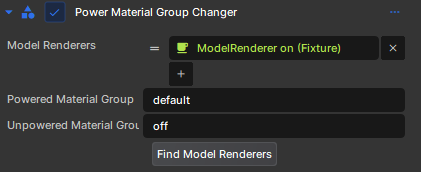
    Light models also need to change material group based on their on/off status. Any decently created light model will have a material for the “on” state that has self illumination to make it look lit up.

    This i created as a separate component to test out the modularity of the system.

    I’ll have to see if making an uber derived component or a multiple smaller modular components that interact and respond via events is the better way to go in the long run. Though I suspect smaller modular components will be the best.

    The demo

    Okay you’ve survived the technical stuff, or maybe you skipped past it, let’s see how this all looks in game right now

    We can see I press a button, which causes the main lights to turn off and a red emergency light turns on. There’s a power down sound effect that comes from those white generators in the room.

    I’ve also tested all of this in a networked setting and it works. We’re one step closer to our first playtest!

  • Find what you Need

    Finding needs in the original Morbus was a pain in the ass. In this iteration of Morbus it can be better. It’s great that I actually know how to program and have 10+ more years of experience under my belt.

    S&Box has a nice NavMesh system built in, I can generate a NavMesh of the scene in the editor, then at runtime I can query it for a path between the player and the need location they need to go to.

    You can see in this video a simple debug path being rendered.

    And if we then make it so we shoot “particles” along the path with a trail, we can get an effect like this:

    These videos were taken a few days apart so you’ll notice some lighting in the map that gets added. The map is still WIP and i’ll post a more in-depth update on it later. You might recognize it as Chemical Labs from the original Morbus.

  • Item System

    In classic Morbus the only things you could pick up were weapons and ammo. Utility items like Medkits, glowsticks, grenades, etc, were essentially just weapons as well. This was simple and it was how things typically worked in Garry’s Mod at the time.

    In this iteration of Morbus I wanted more flexibility; what if not every item is a weapon? Therefore I’ve created an Item System.

    Items

    This system is based off of what i’ve learned from working on my preivous game Shoothouse. It worked pretty well and so I’m using a similiar system for Morbus. Let’s dive into how it works:

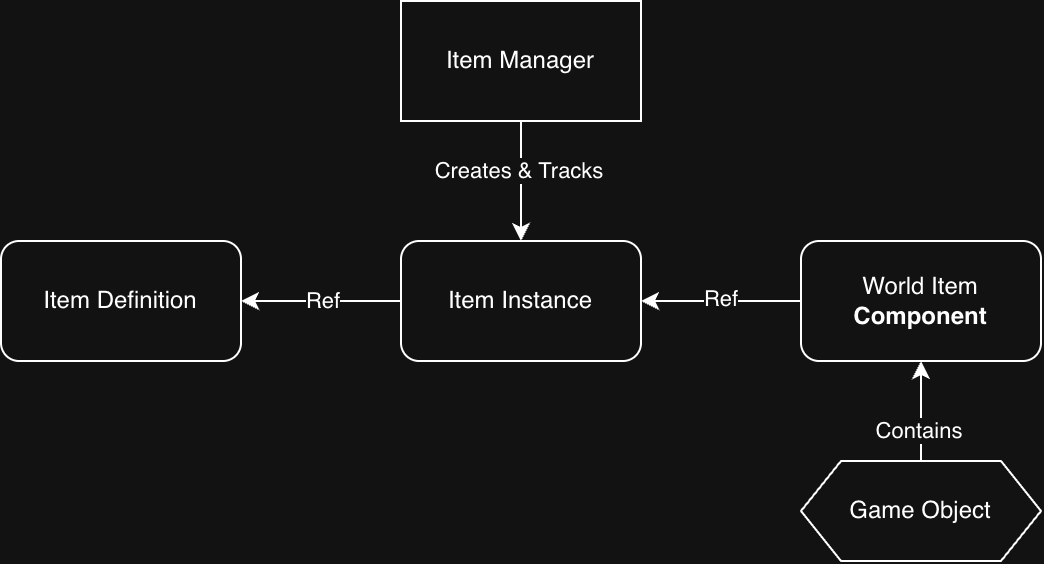
    There are four major parts of this item system;

    Item Definition

    This describes what an item is, you can think of it as the template or archetype of any given item. It contains things like:

    • The unique identifier for this type of item
      • I use strings, and call it a “classname” ie “Item Class Name”
    • The user-friendlyname of the item ie “Display Name”
    • The Icon that represents this item
    • The 3D model that represents this item

    Since all of these attributes would be the same across all types of items, they’re stored inside of the item definition.

    I also have derived ItemDefinition types, for instance I have an FirearmItemDefinition which describes things like a firearm’s damage, RPM, etc.

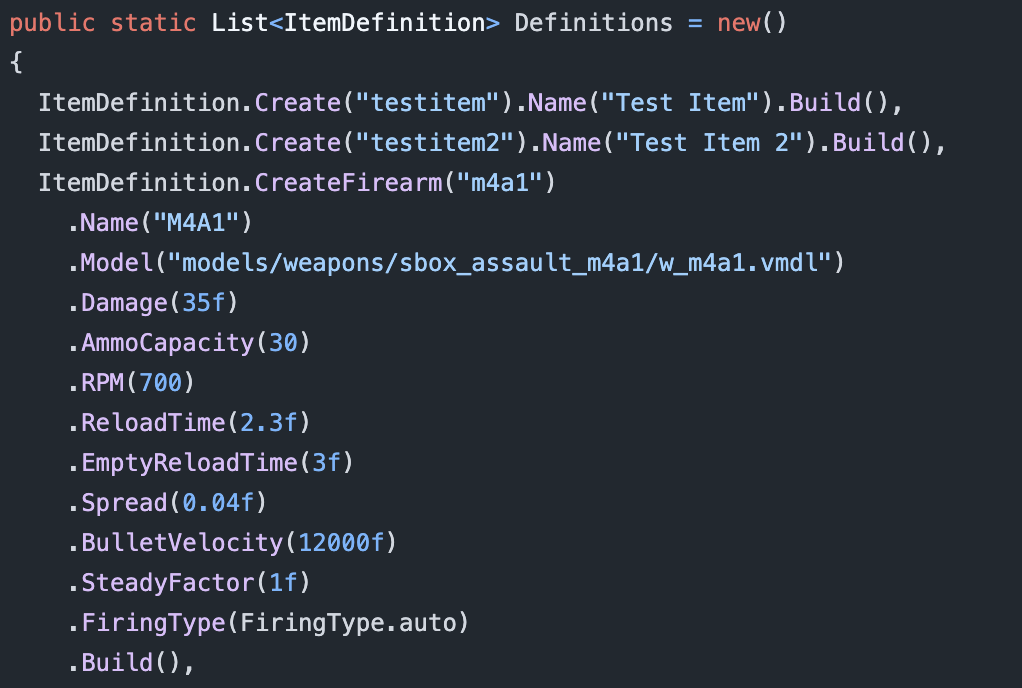
    There’s a Items.Definitions.cs file in my codebase where I define all the items in code, via a helper builder class I made, it looks like this:

    This way I can do Items.GetDefinitionOf(“someitemclass”) anywhere and it will give me the definition of this item.

    I include firearm stats in the item definition for two reasons

    • If I ever need to query the stats of a firearm item, they are already inside of the item definition
      • This assumes all firearms of a type have the same stats
    • All firearms that get created via item (more on this later) have their stats copied from the item definition into the firearm itself
      • I can look at all firearm stats in one place (and in code!), making it easier to update and balance them

    Item Instance

    An item instance represents an “instance of an item” and it must reference an Item Definition so we know what type of item this instance is of. It’s kind of like an instance of a class vs the class itself.

    Right now ItemInstance is incredibly lightweight, it only contains an “Item Instance Id” which is stored as a Guid and a “Item Definition” which is a reference to one of our Item Definitions.

    In the future we can either add more attributes to the Item Instance, or we can create derived Item Instance types for specialized types of items.

    For instance if our item was a Medkit Item, we could create a MedKitItemInstance which has an additional property “Charges” which would record how many charges our medkit has before it is empty.

    The Item Instance is also where all of the logic lives for what happens when a player “picks up the item”, “drops the item”, “has the item removed from their inventory.” Most of these are empty or virtual at the ItemInstance level but some cool things happen in some of our derived types.

    The best example right now is in Morbus we have a CarriableItemInstance which is used for any “Carriable Item” (these will refer to a CarriableItemDefintion that is derived from ItemDefinition.)

    A “Carriable” is refers to something that “A player can carry in their hands, ie a weapon, medkit, grenade, etc.” For a player to actually have a carriable in Morbus we have to create a gameobject to represent this carriable, and parent it to the player’s pawn. Then we have another system that manages which carriable is currently in the player’s hands and when to swap.

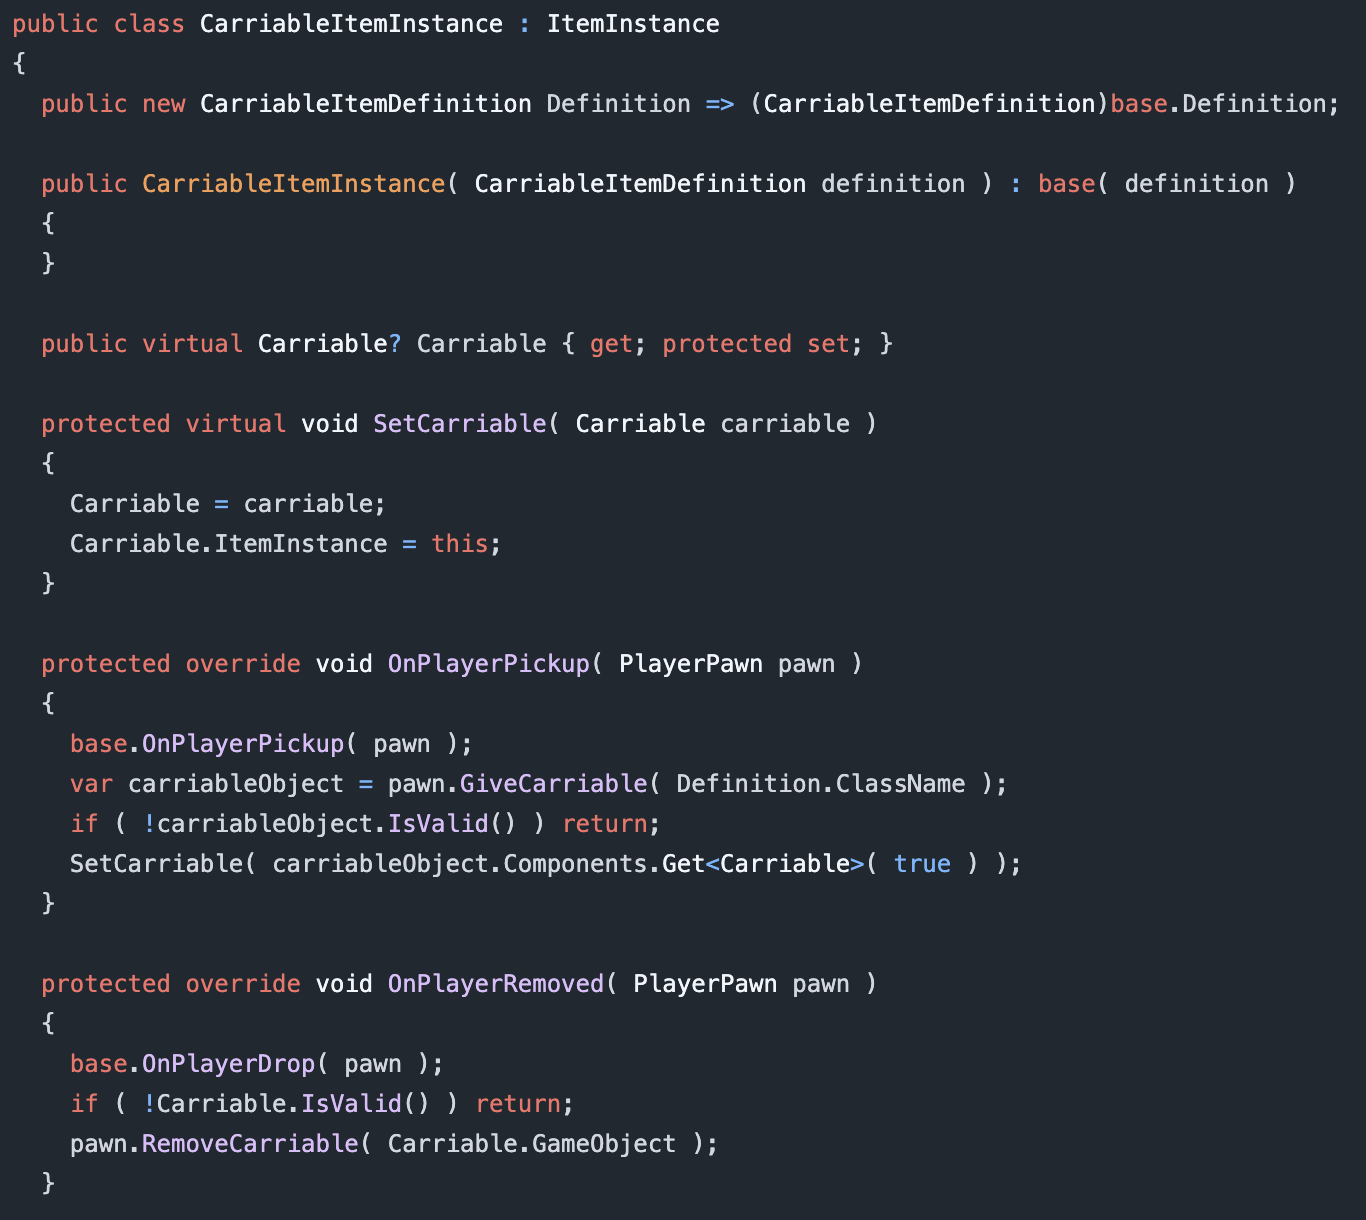
    Now when a player picks up a carriable item, we need to create that gameobject that is the carriable (for example if it was a gun, the gun itself.) The CarriableItemInstance is where this logic exists of “create and parent the carriable game object when the player picks up the carriable item” as well as the inverse of “the player has lost the carriable item, so we must destroy the carriable game object”

    If you care about code; here’s how it looks

    pawn.GiveCarriable is a helper function which essentially;

    • Creates the carriable game object
    • Parents it to the player’s pawn

    While pawn.RemoveCarriable does the inverse

    Meanwhile our “Carriable Object” also gains a reference via Carriable.ItemInstance back to the CarriableItemInstance that it is representing.

    Represent is the key word here.

    Keep in mind that all of these are abstract concepts, that we are using these things to represent them.

    The Carriable Object represents the Item Instance in the game world.

    World Item (Component)

    While everything else we’ve talked about has just been some class/object, World Item is the first actual component we’ve created.

    World Item solves the problem of “How do we represent an item when a player drops the item from their inventory into the world, or there exists an item somwhere in the world for a player to pick up”

    We are tying the abstract concept of an “Item Instance” to a physical object in the world. This is similar to the Carriable Object we were referring to before, but the major difference is a World Item can be picked up by a player, while a Carriable Object was a physical representation of an item in a player’s possesion.

    Therefore we can imagine that the World Item has some sort of method on it that the Player will call to “pick up the item”

    This is already a code heavy post so how about we look at the code here too;

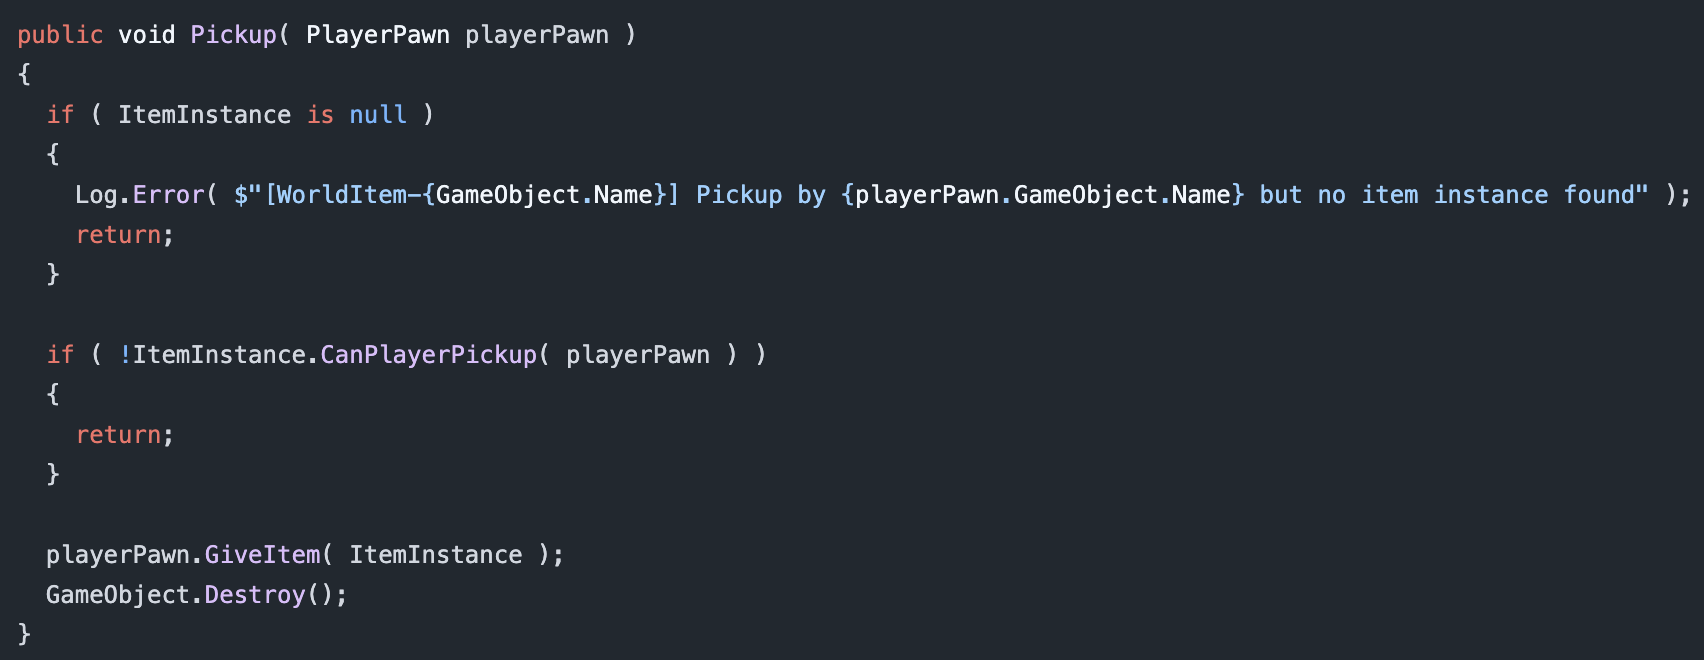
    This Pickup method (on WorldItem) is called by a player pawn when a player looks at a gameobject that has a WorldItem component, and presses their “Pickup Item” key.

    We can see that we verify that our WorldItem has a valid ItemInstance associated with it, and if it does, it “gives the item” to the player and then destroys the game object.

    Thus the player has the item and the “physical representation” of the item is destroyed.

    playerPawn.GiveItem adds the ItemInstance to the player’s inventory, you can think of their inventory as a list of ItemInstance’s and then calls functions like “OnPlayerPickup” on the ItemInstance.

    If our ItemInstance happens to be a CarriableItemInstance it calls that OnPlayerPickup we saw earlier which results in a “Carriable Game Object” being created and parented to the player’s pawn.

    I’ve said “Carriable Game Object” a little loosey goosey this post. When I say “Carriable Game Object” i mean “A game object which has a Carriable component and whatever else it needs” or “A game object that is represents a carriable thing, whether that thing is a gun, medkit, etc.”

    Item Manager

    The last piece of the puzzle.

    The Item Manager is a singleton component that “manages” all Item Instances in our game. By manages it really just keeps a big list of them and makes sure no funny business is happening.

    Since Morbus is a multiplayer game we need to make sure that all players are aware of all items that exist. Our manager solves this by telling all players whenever an item is created or removed.

    Bonus Component – World Item Placement

    In Morbus we need to seed the map with weapons, and so being able to visually place them would be ideal.

    It would also suck to place a bunch of items, and then later need to change the prefab or the game object that is these items. We’ve also discussed how every WorldItem needs an ItemInstance, but when the scene loads there are no ItemInstances created yet.

    Thus we have a World Item Placement component.

    When the scene is first loaded, this component will

    • Create an ItemInstance based on a given Item Class Name
    • Create a “World Item Game Object”
      • This is a game object with the World Item Component
      • A model renderer to represent the item
      • And everything else it needs (like a collider)

    When choosing the Item Class Name for a placement we can either give it a single value, thus garunteeing it will always be that type of item. Alternatively, we can give it a weighted list of class names, thus allowing us to make the item random.

    Things to Improve

    Right now there’s nothing that makes sure that an ItemInstance doesn’t exist in two places at once. This isn’t required at the moment but as complexity increases it will help prevent bugs. Solving this would be pretty simple, creating a lock on an item that must be unlocked by the user/consumer, or just having some sort of location id tracker to verify that when an item is moving from one place to another the request isn’t outdated.

    Item creation is also P2P right now, so any client could create an item and send it along the network. Cheaters will love this. A simple fix is making Item creation host authoritative and making sure whenever an item is created it happens for a valid reason. We’ll deal with the possibility of cheaters later.

    Overall

    It’s a simple system and I like it. Here’s a demo of it in game;

    In the demo we can see

    • Placing items in the world
    • Helper buttons that will move the item to be resting on a surface
    • Changing the type of item that will be spawned
    • Seeing the randomness
    • And then picking up items

    There’s also a bonus thing that I did with items in Morbus which is making it so a player can hold the world item in their hands without actually putting it in the players inventory.

  • One Full Round

    This is a tiny amount of work in the grand scheme of things, but it’s going to be a memorable moment.

    Anyways, today marks the day of the first complete “round” in this version of Morbus. This is the core gameplay loop;

    • All players are spawned as humans in a “warm up” game state
    • A few (or one) player is chosen to be a brood alien
    • The brood alien player can transform into their brood alien form
    • If a human is killed by an alien in their alien form, they respawn as an alien
    • If a brood alien is killed, or a human is killed by guns, the player respawns as a swarm alien
    • If all brood aliens are killed, humans win and the game ends
    • If all humans are killed, aliens win and the game ends
    • After a short “cooldown” period, we restart

    This has all been implemented.

    Of course there are some bugs, like Brood Aliens can attack Swarm Aliens, and vice versa, but that’s a quality of life improvement 🙂

    I remember when I passed this milestone on the original Morbus in Garry’s Mod. I had spawned bots and used a console command to make them mirror my actions to test things out. (I should maybe build bots like that too.) This was all done in gm_construct back in the day, it’s amazing how far things have come since then.

    What’s Next

    I had to use the citizen model for the swarm alien and the brood alien claws I had made as well. So it would probably be a good idea to sculpt another derpy alien model for swarm aliens, both world and claw view models to serve as a placeholder.

    There’s no UI yet to tell you anything about what’s going on. I like to avoid building UI for as long as possible but it might already be time to have some sort of visual display of HP, Alien/Team status, Round State, and Victory/Defeat messages.

    Further On

    Humans right now spawn with a gun, this isn’t the Morbus way. They need to have only have a melee weapon (or maybe just fists) and find weapons and ammo in the environment. So we’ll need to build a system for

    • Items to be in the environment
    • Ability to pick up items
      • Either into an inventory or a weapon slot bar
    • Ability to drop items

    Ammo also needs to be handle, so we’ll need to decide how we want inventory to work. Do you have weapon slots like in the original Morbus, or do you have inventory slots that you get to decide how to fill?

    Also do we have items which are not weapons? So many decisions and things to think about! To keep things simple for myself I’m thinking I’ll just keep things the same as the original Morbus for now and then iterate upon them later.

    We also are going to need a map pretty soon. I’m going to look into seeing if I can somehow import the original spaceship map into S&Box and use that as a base.